post

Garden of D’Lights

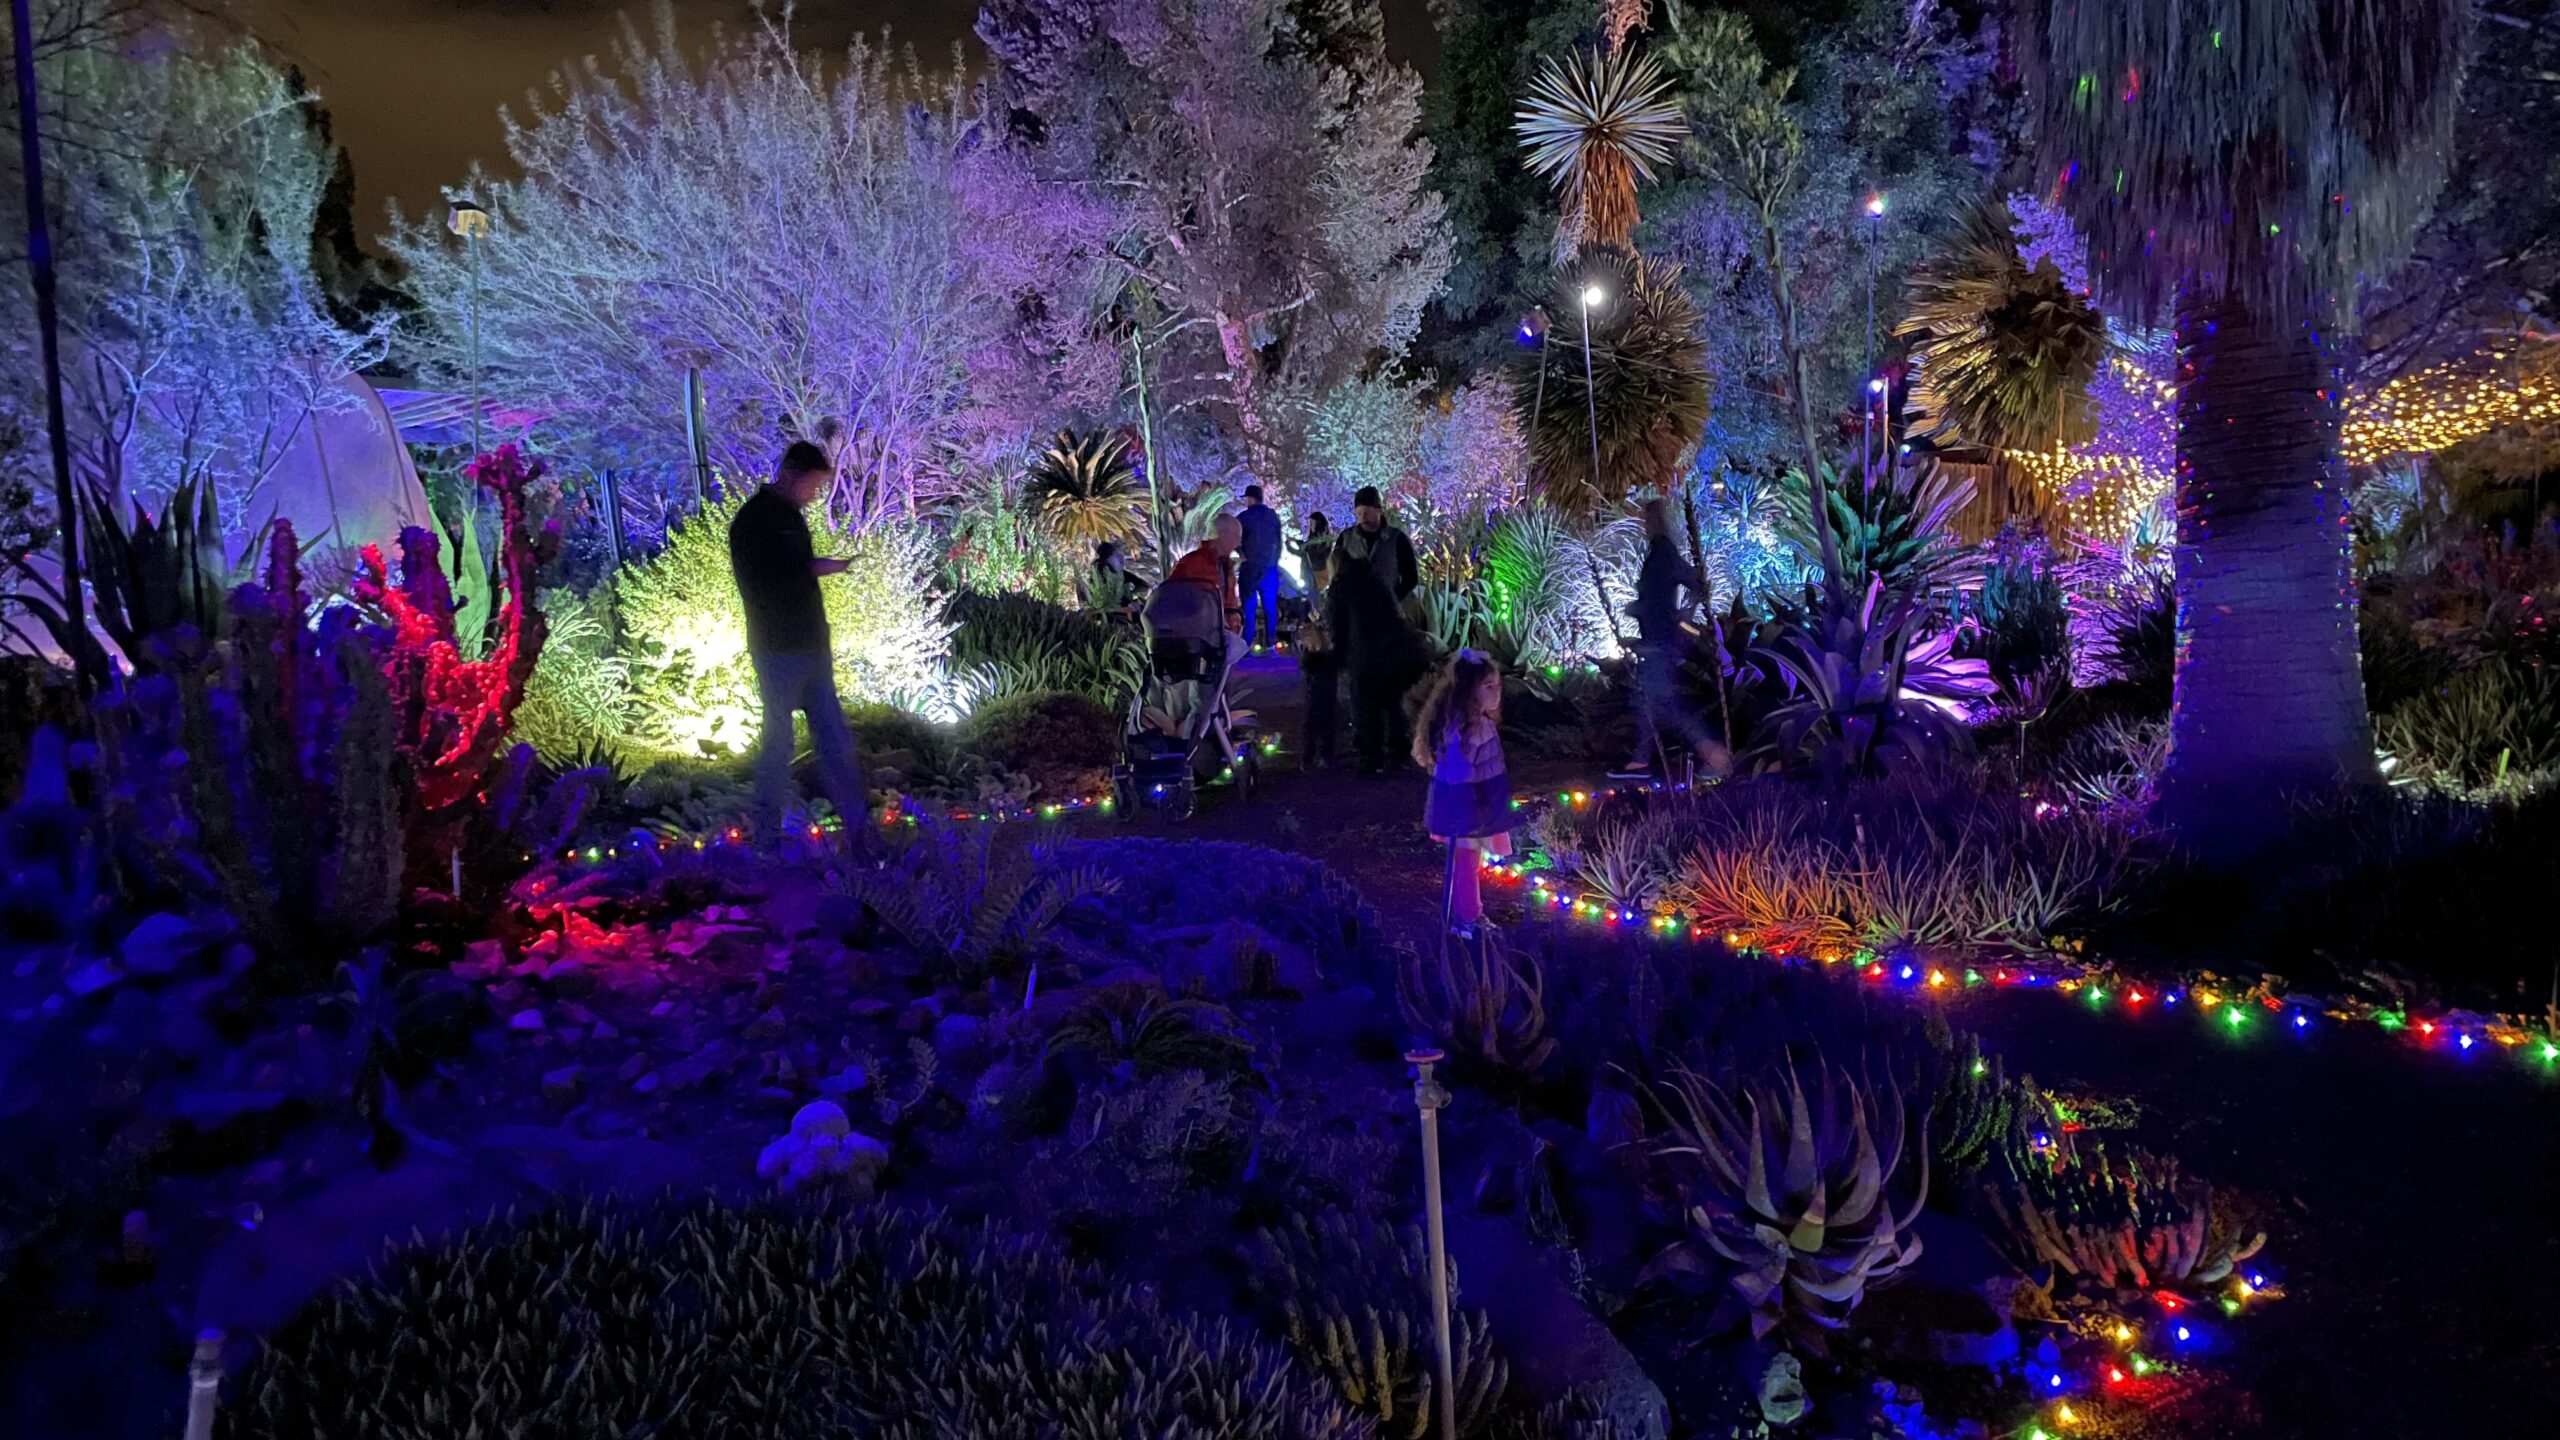
In December 2018 I was asked if I would like to put together a light show to light up the plants at The Ruth Bancroft Garden in Walnut Creek, California.

If you like weird and unusual plants and you’re not familiar with The Ruth Bancroft Garden, you should come see it. Tripadvisor has named The Ruth Bancroft Garden The most beautiful garden in the world and The Garden Conservancy says that “The Ruth Bancroft Garden is recognized as one of America’s finest examples of a dry garden. It features a variety of rare and extraordinary succulents and cacti and has a year-round presence, coming in and out of bloom and coloration as if the plants were absorbed in a fascinating conversation with each other.” It’s a world-famous garden which attracts thousands of visitors every year.

I spent the next year researching LED and laser lighting to create some unique lighting installations for the garden. Some of the installations I created used NeoPixel LED strips and many people have asked me how I created these lights, so I am documenting these installations here, including the Arduino C++ source code used to make the NeoPixels work.

GoDL 2023 – Valley Oak with color-changing Japanese Lanterns

GoDL 2023 – LED lighting on plants behind the pond

GoDL 2023 – LED lighting on agaves

GoDL 2020 – Koi Pond

NeoPixels

I started researching NeoPixels by reading and re-reading the Adafruit NeoPixel Überguide. If you’re planning on building anything I recommend that you do the same. The Überguide is your best place to get started. I will not be repeating information here that’s already covered in The Überguide, so if I say something here that doesn’t quite made sense go back and read The Überguide again.

I built 3 different NeoPixel installations:

  • Dancing Oak – The garden has a 200+ year old Valley Oak tree with a trunk that has a 4m (13 foot) circumference. My plan was to run (12) separate 5m strips of NeoPixels up the trunk spaced 0.3m (1 foot) apart and held in place with black bungee cords. The NeoPixels would travel up the trunk into the branches until we got to the end of a strip. The lights would pulse up from the earth and make the tree appear to spin and “dance”. For the 2023 show I moved the lights from the Oak tree to a hillside at the back of the garden where people say it reminds them of a lava flow or large glowing worms.
  • Light Stream – There is a dry stream bed in the garden and I wanted to make it appear as if there was water flowing through and fish swimming in it. I took (4) 10m NeoPixel strips to make the stream. The lights were programmed to pulse in different shades of blue to represent waves of water, while salmon-colored lights swam “upstream”.
  • Sky Circle Triangle – Originally envisisoned as a 40m cicumference circle of lights suspended 4.5m-6m (15-20 feet) in the air, making a rigid circle wasn’t practical for the site so I ended up using steel cable mounted to three trees in the garden’s Eucalyptus Grove and created a “Sky Triangle” instead. The effect still works, and mesmerizes people passing through the grove every night of the event. Many guests refer to the effect as “fireflies” or “glowing orbs”: six lights chase each other around the sides of the triangle, sometimes passing through one another and sometimes bouncing off each other.

For all three installations I used:

  • An Arduino “Mega” microcontroller. (I originally used Arduino “Metro” boards, then found out that they didn’t have enough RAM for the number of LEDs I was using, so I replaced them with “Mega” boards which come with more RAM.)
  • One or two 5VDC @ 20A “brick” power supplies.
  • A 1000uF capacitor connected across the DC power supply to protect the Arduino and NeoPixels from power surges.
  • A 470 Ohm resistor between the Arduino data pins and the NeoPixel signal line for each NeoPixel strip connected to the Arduino.
  • A waterproof case.
  • Cable glans waterproof cable connectors on each case.
  • 3-wire twist-to-connect waterproof cable connectors, one end soldered to the NeoPixel strip, one end going through the case to connect to the Arduino and power supply connectors inside the case.
  • Terminal screw blocks for connecting cables to power.
  • Heat shrink tubing to seal all of the wired solder joints.
  • Larger, clear heat shrink tubing to seal and strengthen the connections between soldered-together NeoPixel strips.

An Arduino is a low-power microcontroller that can be programmed to do simple tasks, such as to send a signal to a NeoPixel strip that tells Pixel #117 to glow purple. An Arduino will send whatever signals you tell it to send, over and over and over again, for as long as it has power. To program an Arduino you use a USB cable connected between your laptop and the Arduino. You write the code on your laptop, send it to the Arduino, unplug your laptop, and power up the Arduino.

Each NeoPixel strip is controlled by 3 wires: black (GND), red (+5VDC), and yellow (signaling, sometimes labeled DIN). The 5VDC @ 20A “brick” power supplies I use have a barrel connector on the end, but if you cut that off you’ll find 2 wires inside the cable: black (GND) and red (+5VDC). If your project requires more power you can get a supply that provides more amps or connect two 5VDC 20A supplies in parallel (red to red, black to black) to provide 5VDC up to 40A.

For what it’s worth, a single 5VDC@20A supply running at maximum capacity is drawing ~1A from the 110VAC wall socket, so it’s not using a lot of power, put it can still kill you. Be careful when you’re working around live electrical sources.

To get a strip to work you have to connect the NeoPixel’s DC+ to the power supply’s DC+ (red to red), the NeoPixel’s GND to the power supply’s GND and the Arduino’s GND (black to black), and the NeoPixel’s signalling wire through a 370 Ohm resistor to one of the digital signalling pins on the Arduino.

You also need to provide power to the Arduino itself. When programming the Arduino, the Arduino gets all of the power it needs from the USB cable. When you’re done programming it still needs to get power from somewhere. I usually take an old USB cable, cut it in half, and connect the USB connector’s red and black power wires directly to the power supply’s red and black power wires. When I’m done programming the Arduino I just replace the USB cable that connects my laptop to the Arduino with the cable from the power supply to the Arduino. (Check the control box pictures below for examples.)

Refer to the Adafruit NeoPixel Überguide Basic Connections page for more wiring details.

Testing NeoPixels

To test a strip I attach the NeoPixel signalling wire to pin 0 on the Arduino and run the neopixel-test-single-strand.ino code. This code is set up for (1) 150 LED NeoPixel strip (a 5m strip with 30 LEDs/m). If that doesn’t match what you have just modify the constants at the beginning of the code block to match what you’re using. If it works you should see colored light pulses down the entire strip, as shown in the video below:

Neopixel Test (2019-05-18)

I also wrote some test code to light the first and last pixels on a strip (handy when you’re soldering multiple strips together) and some code to test multiple strips at once.

Dancing Oak AKA “Lava Worms”

The original code used in 2019 for the Dancing Oak used multiple colors rotating around and twisting up the oak tree. However, because of the fact that the lights were not well-aligned left to right the effect was diminished. I though of programming an offset number of LEDs per light strand so that a strand that was 5 LEDs “lower” than the one next to it would be offset by 5 LEDs and then the lights would line up left to right, and then reprogramming the controller after installation with the “as installed” offset, but due to the uneven nature of the oak’s trunk an offset that worked at the base might start to look “off” 1 or 2m up the tree, so I abandoned that idea.

Instead I changed the entire program in 2020 and made the lights go from the base of the tree pulsing up, abandoning the counter-clockwise sprial.

In 2023 I installed color-changing Japanese Lanterns in the oak tree and moved the NeoPixel installation to a hillside at the back of the garden, where most guests decided that it reminded them of lava or worms.

Dancing Oak (2020)

Lava Worms (2024)

Dancing Oak control box (2019)

Dancing Oak and Sky Triangle control boxes (2019)

Light Stream

For the Light Stream I took (8) 5m NeoPixel strips and soldered them to make (4) 10m strips. Then I attached them to an Arduino Mega programmed to pulse in different shades of blue to represent waves of water, while salmon-colored lights swam “upstream”. I installed the strips in a winding dry stream bed.

Light Stream (2021)

Light Stream control box (2019-10-19, in progress)

Sky Circle Triangle AKA “Fireflies”

For the Sky Triangle I originally took (8) 5m NeoPixel strips and connected them all together to make one long 40m strip. However, I found out that the signal strength of an Arduino Mega drops off after about 25m, so I couldn’t get a consistent, stable signal to the LEDs at the end of the strip.

Since it was a triangle I solved the problem by splitting the strip into (2) 20m sections and connecting both to the the Arduino, so the 2 signalling pins each controlled half the triangle. On the far side of the triangle I physically attached the two strips together using heat shrink tubing, but didn’t make an electrical connection. Then I just had to write the Sky Triangle Arduino software so that one pin controlled the first half of the triangle and one pin controlled the other half.

Sky Triangle (2020)

Sky Circle Triangle control box (2019-11-08)

Need Help?

If you need help try asking in the “LEDs ARE AWESOME” Facebook Group. You can usually find me (and lots of other helpful people) there.

Code and License

All of the code for these projects can be found on Github. All code is licensed under the GPLv3.

Hope you find this useful.

post

Making JIRA Suck Less

Why JIRA Sucks

JIRA is almost universally reviled by every engineer that I know. Most of them can’t quite explain why is sucks, they just hate it.

In my view the problem isn’t JIRA, it’s how managers implement JIRA’s features that causes so much suckage. Here’s a short list of the problems that I see every time I start at a new company:

  • JIRA’s default settings suck. Most people start with the default settings and try to build on top of them, extending them as they go along. If you build on a foundation that sucks, whatever you build is also going to suck. Don’t use the defaults.
  • Managers try to implement overly-complex workflows. I’ve been successful using five status states. You might need four or six. You don’t need 17. Use the minimum number of status values required to express the states you need to track.
  • Managers try to implement workflows that require changing a ticket’s owner when the status changes. e.g. Bob finished the coding, now we need to assign it to Carol and Ted for code review, then Alice needs to write the test plan and QA the code, and finally Vladimir needs to sign off on QA and generate a release build before the ticket is complete. Later the VP of Engineering gives Vladimir a huge bonus because he’s the only one completing any tickets, and the fact that Bob & Carol & Ted & Alice worked hard on that ticket has been lost unless you manually check the ticket’s history. There’s no way to get a list of the tickets that Bob worked on, or Carol, or Ted, or Alice. A single ticket should be assigned to a single person, worked to completion, and closed.
  • Managers add values for priorities, resolutions, status, and other fields without documenting how they’re supposed to be used or training their staff how they are supposed to use them. Use the absolute minimum number that you need, make sure they’re self-explanatory, then still train your staff on how to use them.
  • Managers limit which status states can transition to other status states, frustrating end-users. Allow every status to transition to any other status.
  • Managers use generic names for priorities, resolutions, and status fields that are meaning-free, or use multiple names that have almost identical meanings. Do I “close” a ticket or “resolve” it? Which priority is higher, “urgent” or “critical”? Use the minimum number of values that you can, and make the choices self-explanatory.
  • No one cleans up their shit. If a manager adds a new field for a poorly-thought out project to track something or other on JIRA tickets, and then abandons that effort after a month, you can bet that engineers will still be prompted to enter a value for that field 4 years later. Resist the temptation to add more fields to JIRA, clean up after yourself when you give in to that temptation, and don’t be afraid to delete data.

Making JIRA suck less

Many years ago I was working for a startup that got bought by a large disk drive manufacturer. I was doing R&D work on large-scale object storage and as we were launching a new project I was told we needed to use JIRA to manage our task workloads. I wanted to dive in and start documenting all of the tasks that we needed to complete to get the project started, but one of the older engineers stopped me. He said we needed to meet first to discuss the configuration of JIRA for this project.

I was very reluctant to do this, my boss was asking me to get the tasks entered so we could start planning schedules and assigning work, but this guy was more experienced with JIRA so I met with him first. Afterwards I was glad I waited. I’ve applied what I learned at every company since then and made JIRA suck less at all of them. I documented what I did, and many managers I worked for have reached out to me after we parted ways on asking for a copy of my “JIRA document” so they could apply it at their new jobs. This is that document.

JIRA Workflow

Goals for JIRA

These are the things we want to accomplish using JIRA.

  • Track all of the tasks engineers are working on.
  • Be able to report on what tasks are necessary to fix a bug, finish a release, complete a feature, complete a project, or are related to a specific portion of the software stack.
  • Make using JIRA usage frictionless by having few, very concise, clear values for ticket fields so that an engineer never has to wonder what value a JIRA field should have.
  • Have a clear set of goals for each Sprint.
  • Get better at estimating how much work we can get done within a period of time.
  • Make sure that bugs are being fixed in a reasonable period of time.
  • Use JIRA’s automated reports and dashboards as a way to communicate back to PMs, Sales, Execs, and Engineers how much progress had been made on towards delivering the features they were specifically interested in.
  • Use JIRA’s automated dashboards to forecast how close we are to completing major deliverables.
  • Make sure that the tradeoffs that need to be made when goals are changed are clear to PMs, Sales, Execs, and Engineers.

Ticket Scope

A ticket should describe a single task that can be done by a single person within a 2 week period. A ticket that requires one person for longer than that should be broken into separate tickets.

If a ticket requires QA, documentation, or another related but independent task, create another ticket for that task and link the two tickets. Tickets can be linked across projects.

Do not create sub-task tickets under a ticket, just create more tickets. Sub-tasks have limitations on tracking, reporting, and cannot be part of a different project. Don’t use them.

If a project is truly huge with many moving parts, create an Epic and put the tickets in the Epic.

JIRA Fields

Ticket Status

There are five ticket statuses:

  • Backlog
    • All tickets start out as Backlog.
    • New tickets are not assigned to anyone and are not scheduled.
    • To schedule the ticket is assigned to someone and the status is changed to Selected for Development.
  • Selected for Development – Work has been defined, assigned, and scheduled but not started.
  • In Progress – The ticket is actively being worked on by the person it’s assigned to.
  • In Review – Assignee has completed all tasks, is waiting for reviewers to complete their reviews, or is waiting for blocking items to be completed, e.g. QA tasks, other engineering work, requestor sign-off. Blocking items should have their own tickets and be linked to the tickets that they block.
  • Closed – Ticket has been completed. A “Status: Closed” ticket has a small set of possible resolution values:
    • Done
    • Duplicate
    • Rejected (Won’t Do)
    • Cannot Reproduce

In order to reduce the amount of task-switching and improve focus each engineer should have no more than 3 – 5 tickets actively being worked on, “Selected for Development” and “In Progress,” combined.

Using this method and a 4-column Kanban board based on Ticket Status (omit backlog) every engineer and manager can see at a glance what needs to be done this week (Selected for Development), what’s in progress, what’s being reviewed, and what has been done.

Transitions should be defined from every state to every state. If someone wants to drag a ticket from the “Selected for Development” column and drop it in the “Closed” column they should be able to do that.

Transitions to Closed should prompt the user to fill in the resolution state

Assignee

The person who will be doing the work to complete the ticket. Usually this is set when the ticket is Selected for Development and doesn’t change.

Reporter

The name of the person reporting the problem or requesting the feature.

Components

Each ticket has one or more Components. A component is a limited set of fixed categories which define which group has the primary responsibility for the ticket. Components are usually named after a product or service being developed. End-users should not be able to create new components.

A ticket with no assigned owner may be automatically assigned to the lead person responsible for that component.

Components are mostly used for reporting, to see how much backlog remains to be done for a given software product or service. By keeping the number of components limited to a small set of categories they become useful for reporting, running queries, or building dashboards.

Labels

Labels are “free form” and can be used to tag a ticket so that it’s included in specific reports.

Now if a manager has something that they want to report on across multiple tickets, rather than adding another field they can just add a label and generate reports and make queries based on that label. When they lose interest a month later they can stop using that label, without forcing engineers to fill in extra, unnecessary fields for years to come.

Customer

Name of the customer (if any) who requested this task or reported this bug. This is so you can follow up with the customer afterwards to let them know the issue was fixed, or know who to ask if there isn’t enough information given to resolve the task.

Issue Types

  • Task – Something that needs to be done.
  • Bug – Something that needs to be fixed.
  • Epic – A collection of tasks and/or bugs needed to complete a feature.

Remove any other issue types included as JIRA defaults.

Need a “Story”? A Story is just a loosely-defined Epic that’s in a Backlog state. You don’t need a “Story” type.

Need a “Feature”? A feature is either a Task or an Epic with multiple Tasks in it. You don’t need a separate “Feature” issue type.

Task, Bug, Epic. That’s it. Keep choices to a minimum so end users don’t have to think about what to use.

Affects Version / Fixed Version

  • Affects Version – For a bug, the version or versions affected by the bug.
  • Fixed Version – The version (first release) or versions (first release, edge release, maintenance release) where the fixed bug or completed task appears or is scheduled to appear.

Versions are used when it comes time to issue a release. You can easily see what work needs to be done to complete all of the tasks in a release. You can generate a change log of all of the changes that are in a release.

Priorities

By default JIRA assigns a default priority to tickets. After a while you have to wonder, is this ticket really a “High” priority or is it a “High” priority because no one changed the default when the ticket was created To avoid this, make your tickets start with priority “None”. Now it’s clear that no priority was assigned.

At my company, if the filer doesn’t set the ticket priority, the product manager, engineering manager or team lead would set the ticket’s priority. If there is disagreement they can have a discussion to determine the correct priority, and the managers make the final decision. If the managers cannot reach agreement the VP of engineering breaks the tie. I don’t think it’s ever gotten to the VP.

Valid priorities are:

  • P0/Blocker – Drop everything else and fix this
  • P1/Critical – Important and urgent
  • P2/High – High priority. Important or urgent, not both
  • P3/Low – Low priority. Not important or urgent, but should get done as time permits
  • None – Priority has not been determined (default)

However you assign priorities to tickets at your company, define the process and let people know what it is.

Description

In the description of every ticket the filer has to include a “Definition of Done” (DoD) — a statement of what the system behavior would look like once the problem is fixed. This was very important since the person filing the ticket often has a very different expectation of what “done” looks like compared to what the person completing the ticket thinks “done” looks like. This mismatch can occur in both directions — sometimes the person doing the work does far less than what was needed and sometimes they do far more than what was needed, turning a 2 hour task into a two week project.

If a ticket is assigned to someone with no DoD the assignee should ask the reporter to add a DoD.

Due Date

If we promised a customer or anyone that a task would be completed by a specific date, then fill in the due date. Otherwise leave it blank.

Additional Fields

You may need some additional fields for your workflow. Some people like to track story points or effort required per ticket. If you need them, add them, just try to keep the number of fields that someone needs to fill in to the absolute minimum.

If you later find you’re not using a field, delete it.

Retrospective

Meeting every two weeks to discuss completed tasks, uncompleted tasks, what went well and what could have been done better over the past two weeks.

Stand Ups

When you do a stand-up and have the Kanban board for the group displayed on a large monitor, then the stand-up only needs to cover two questions:

  • Is the board correct?
  • Do you have any blockers?

Engineers appreciate brief standups. Make sure you’re tracking the right things, make sure that everyone has what they need to get things done that day. Standup completed.

Git

If a branch is created for a JIRA ticket put the branch name in the ticket. If an MR has an associated JIRA ticket you should be able to find the JIRA ticket from the MR or the MR from the JIRA ticket.

Both Github and Gitlab have JIRA plugins that can post updates to JIRA tickets with a link to the MR, on test pass/fail status, merge status, reviewer comments, etc. They can even automatically close tickets when an MR merges. Use these plugins to automate workflows and reduce time spent by engineers managing their JIRA tickets.

Summary

  • Keep the number of JIRA fields to fill in to a minimum.
  • Keep the workflow simple.
  • Don’t make people think about what they need to do — make it obvious.
  • Document your workflow.
  • Make sure that end users know how to use the system.
  • Automate required reports and dashboards.

I have applied these rules at three startups and several pretty large companies since I first wrote them down. Hopefully you can use some of these lessons at your company, because you may be required to use JIRA, but it doesn’t have to suck.

post

What to do when your Facebook account is “hacked”

I still use Facebook. About twice a month one of my friends posts “My Facebook account got HACKED! I changed by password but they’re still sending friend requests to my friends! What do I do?”

Or something similar.

Rather than re-typing the same basic instructions to people again and again I decided I’d put these handy instructions into a blog post and after this I can just send people this link. Saves me a lot of typing.

First off, if you can log into your account and change your password then you still have control over your account. If you go check your profile and all of the recent messages were posted by you, then no one else is accessing your account either.

If someone is sending friend requests to your existing friends, guess what? They’re not logging into your account to do that. You already have these people as friends, and you can’t send a friend request to someone who is already your friend.

So your account wasn’t “Hacked”. No eViL haX0r took over your account. Your account was “Cloned.”

Cloning is easy to do. This is what cloners do:

  • First they look for someone who has the privacy on their “Friends List” set to “public”. Someone like you.
  • They write down your name, then right-click and download your public profile picture. (Profile pictures are always public.)
  • They create a new account using your name and profile picture.
  • They use your public friend list and start sending friend requests to your friends.
  • After a few days, posing as you, they start hitting up your friends for money or trying other scams on them. “Help me! I’m stranded in [foreign country] and I need money for a [plane ticket/hotel/bail].”

This is what you need to do to fix the problem

  1. Set the privacy on your “Friends List” to “Private”. Now this won’t happen to you again. (probably)
  2. Tell your friends to report the imposter to Facebook. Facebook employees will disable the imposter’s account.

Pretty easy, huh? Here are some detailed instructions.

Set the privacy on your “Friends List” to “Private”

This is what you need to do to make your “Friends List” private. These screenshots were taken from an iPhone, but the same steps apply on a laptop or Android device.

Step 1: Click the Menu button in the lower right hand corner

Step 2: Click on the Gear icon in the upper right corner

Step 3: Scroll down to “Audience and visibility” and click “How people find and contact you”

Step 4: Click “Who can see your friends list?”

Step 5: Click “Only me”

Now the imposters can’t see your friends list and won’t have a reason to clone your account.

Now you just have to…

Tell your friends to report the imposter to Facebook

This is what your friends need to do. (Send them a link to this article if you think that will help them.)

Step 1: Find the imposter’s friend request and click the 3 dots

Step 2: Report the Imposter

Step 3: They’re pretending to be someone!

Step 4: They’re pretending to be a friend of mine!

Step 5: Enter your friend’s name here, select their name from the pop-up list, then click Next

Step 6: You’re done. Click Next to resume wasting time on Facebook

When I’ve reported imposters they’re usually gone within hours.

Hope you find this useful.

post

How to make the best drip-brewed coffee every time

My sister was visiting and I made a pot of coffee. My sister had a cup and said “That’s really good coffee. How did you make it?”

I’ve gotten that same response from many, many people who drink my coffee and I finally realized that there’s a lot of people who just don’t know how to make a pot of coffee. There’s no magic to it: start with good coffee and measure what you put in the coffee pot.

Pretentious coffee snobs are annoying. No one cares about your perfect cup of espresso. If you’re one of those people just go away and die somewhere. Really.

When I bought my first drip coffee maker years ago — a Cuisinart 12-Cup Brew Central Programmable Coffee Maker that’s still being manufactured and sold today — I wanted to make coffee like Starbucks, so I went to the Starbucks web site and read their instructions.

Step Zero – Buy good coffee. They don’t actually say that on the Starbucks site, but they’re assuming you’re buying Starbucks ground coffee. You can’t make good food from bad ingredients, and you can’t make good coffee from inferior beans.

Buy some good quality coffee. It doesn’t have to be from Starbucks, but it can’t be dry brown dust with bits of bean husk in it. The grounds should smell like the best cup of coffee you ever had and look like rich black loam. If you’re looking for suggestions try Starbucks Casi Cielo or Peet’s Sulawesi Kalosi.

Step One – Choose the right grind
For a flat bottom filter, use a medium grind that resembles sea salt. Cone filters use a finer grind that resembles granulated sugar.

Starbucks – How to brew coffee at home


That seems clear enough. My Cuisinart has a cone filter, so get ground coffee that looks like granulated sugar. Easy. Done.

Trigger alert for pretentious coffee snobs: I tend to buy Peet’s coffee and grind the whole pound at once. A pound lasts about a week at my house, so it’s not going to lose any of its vital essence. Get over yourself.

Step Two – Measure
Use 2 tablespoons of freshly ground coffee for every 6 ounces of water.

— Starbucks – How to brew coffee at home


I think that this is where they lose people. 6 ounces of water? My coffee pot says it makes 12 cups. How many tablespoons for a pot of coffee? What if I want to make a half a pot? Or 4 cups?

First off, if you try to make a pot of coffee and you’re measuring grounds by the tablespoon your measurements will be off every time. You will add too much coffee or not enough. Don’t use a tablespoon.

Second, the cups on a drip coffee pot are not the same as a 1 cup measure. A one cup measure is 8 fluid ounces. My “12 cup” Cuisinart pot holds 64 fluid ounces of coffee, so “1 Cuisinart cup” = 5-1/3 fluid ounces. WTF?

Using the Starbucks measuring method I’d need 10-2/3 tablespoons per pot. Try it and you’ll get weak, underwhelming coffee. That’s not how they make coffee at Starbucks.

Make a perfect pot of coffee

My method is simple: Use the lines on the pot to measure water, use measuring cups to measure coffee grounds.

Full pot of coffee – fill the pot to 12 “cups” of water, use 1 cup of ground coffee.

Half pot – 6 “cups” water, 1/2 cup ground coffee.

Third pot – 4 “cups” water, 1/3 cup ground coffee.

Quarter pot – 3 “cups” water, 1/4 cup ground coffee.

Easy, right? Full pot, one cup of ground coffee. Half pot, 1/2 cup of ground coffee. Quarter pot, 1/4 cup of ground coffee.

For advanced coffee preparers:

Two-thirds of a pot – 8 cups of water, add 1/3 cup of ground coffee TWICE!

10 cups of coffee – 10 cups of water, 1/2 and 1/3 cups of ground coffee.

Try this method and and I GUARANTEE you’ll never go back to whatever you were doing to make coffee before or NO MONEY BACK. You too will hear the words “That’s really good coffee. How did you make it?”

Hope you find this useful.