Removing mount volumes from your desktop in Ubuntu 17.10

I just upgraded from Ubuntu 17.04 to 17.10 and one of the first things I noticed was all of the disk volumes that are mounted under my home directory appeared on my desktop. In Ubuntu 17.10, all volumes that are mounted under /home or /media appear on your desktop, and none of the switches in the Settings tool will make them go away.

The names of the folders aren’t even useful. They’re names like 10GB Volume and 20GB Volume. If you have two volumes the same size they’ll both have the same useless name. No hint of where the volume is mounted appears.

I have files, documents, databases, and email going back 20 years, much of it archival data that I want to be able to search but which never gets updated, so I keep these archive directories on separate read-only logical volumes. If my home directory’s file system gets corrupted beyond repair, the archives will still be intact. Since the volumes are read-only a misbehaving program or command-line oops won’t destroy the data.

But I don’t want to see them all over my desktop.

Tweak tool to the rescue! Install the tool and run it:

sudo apt install gnome-tweak-tool
gnome-tweak-tool

Then:

Desktop > Mounted Volumes > Off

No more volume icons on the desktop!

gnome-tweak-tool has other useful settings that are absent from the Settings tool, such as giving you the ability to move the window buttons to the upper left side of your windows.

Want to make the icons on your desktop smaller? Open up the File Manager, browse to Desktop, and select the icon size you want by moving the slider bar. The size of the icons on your Desktop and the size in the File Manager’s Desktop folder both use the same setting.

Hope you find this useful.

Turn off Apple Wallet / Apple Pay notifications and nag screens

The latest version of IOS for iPhone, iPad, and iWatch devices really, really wants you to set up Apple Wallet / Apple Pay. Your devices want you to embed Apple in the middle of every purchase, and they’ll pester you every time you pick up your device with full-screen dialogs insisting that you need to finish setting up Apple Wallet. Right. Now.

I try to limit the number of things that can access my money, and I have no reason or desire to set up Apple Wallet, so I turned the notifications off. They are embedded in three separate places on the iPhone.

Go to Settings > Notifications > Wallet, turn Allow Notifications off.

Go to Settings > Wallet & Apple Pay, turn both the Apple Cash and Double-Click Home Button off.

Go to Settings > Safari, scroll to the bottom, click Advanced, turn Check for Apple Pay off.

After you update the three settings above, you will still see a notice in Settings stating Finish Setting Up Your iPhone.

    • Click Finish Setting Up Your iPhone.
    • It’ll prompt you to Set Up Apple Pay.
    • Click Set Up Apple Pay, then press Cancel or "Set up later" to exit without doing anything.

No more nag screens!

Hope you found this useful.

Article updated on 2018-07-10 and 2019-10-08 for IOS 13.1.2
Article checked on 2020-06-15 for IOS 13.5.1. The instructions still work!
Article checked on 2020-11-27 for IOS 14.2.1. The instructions still work!
 
Article checked on 2022-03-15 for IOS 15.4. The instructions still work! 
Article checked on 2022-10-18 for IOS 16.0.3. The instructions still work!
Article checked on 2023-10-08 for IOS 17.0.3. Made two minor changes to the instructions, and they still work!

post

Running a 6-node CockroachDB cluster with AWS EFS storage

CockroachDB is new distributed database which, like its namesake, is really hard to kill.

CockroachDB implements SQL DML commands for creating schemas, tables, and indexes using the same syntax as PostgreSQL, and it supports the PostgreSQL wire protocol, meaning that any PostgreSQL database driver or client can be used to connect to a CockroachDB database. If you’re currently using PostgresSQL and you want an easier scale-out, highly-available way to deploy a database, you should take a look at CockroachDB. In many cases you can just repoint your application at a CockroachDB server and your application will run the same as it did using PostgreSQL.

The first day I tried using CockroachDB I got a six-node system up and running using CockroachDB’s Docker image on my Apcera cluster using AWS EFS as a backing store in less than an hour. This is what I did to get it working.

Set up an NFS provider for EFS

I already had an Apcera cluster for deploying Docker images running on AWS. This is the same cluster I used for my article on Mounting AWS EFS volumes inside Docker Containers. In fact, I set up the EFS provider using the same steps:

Set up the EFS volume using the AWS console.

Create an NFS provider that targets the EFS volume.

apc provider register apcfs-ha --type nfs \
    --url "nfs://10.0.0.112/" \
    --description 'Amazon EFS' \
    --batch \
    -- --version 4.1

Create a namespace and a private network

Create a namespace and a private network named “roachnet”.

apc namespace /sandbox/cockroach
apc network create roachnet

“roachnet” is a private VxLAN created by the Apcera platform that only containers that I’ve joined to the network can see.

Create the first CockroachDB node

Next I create a container instance called “roach1” from the latest Docker image, open ports 8080 and 26257, tell it to use the EFS provider for storage, and to advertise itself to other CockroachDB nodes so they can find it and join the DB cluster.

apc docker run roach1 --image cockroachdb/cockroach:v1.1.2 --port 8080 --port 26257 --provider /apcera/providers::apcfs-ha --start-cmd "/cockroach/cockroach.sh start --insecure --advertise-host roach1.apcera.local"
apc network join roachnet --job roach1 --discovery-address roach1
apc app start roach1
apc route add http://cockroach.earlruby.apcera-platform.io --https-only --app roach1 --port 8080 --batch

Create 5 more nodes

Create 5 more nodes and add them to roachnet:

for x in `seq 2 6`; do
    apc docker run roach$x --image cockroachdb/cockroach:v1.1.2 --port 8080 --port 26257 --provider  /apcera/providers::apcfs-ha --start-cmd "/cockroach/cockroach.sh start --insecure --join roach1.apcera.local:26257"
    apc network join roachnet --job roach$x --discovery-address roach$x
    apc app start roach$x
    sleep 3
done

I added the “sleep 3” command because when I originally tested this (on CockroachDB 1.1.0) the platform started the containers so fast that the DB got confused and didn’t add all of them to the cluster. All nodes started, but only some joined the cluster. After I added the delay all nodes joined the cluster.

Verify that the containers are all running.:

After that the cluster was up and running. I could connect to the database, create schemas, create tables, add, update, and delete records. I’m pretty happy with the initial results. Next step is automatically generating secure certificates so I’m not operating in insecure mode, then I’m going to run actual applications against the cluster.

Hope you found this useful.

CockroachDB overview screen

CockroachDB Storage Screen

CockroachDB Queues

Quickly get IP addresses of new VMs

I spin up a lot of VMs using VMware Fusion. I generally keep “clean” generic copies of a few different distros and versions of Linux servers ready to go with my login, an sshd server, ssh keys, and basic settings that I use already set up. When I need to quickly test something manually — usually some new, multi-VM distributed container orchestration or database system — I just make as many copies of the server’s *.vmwarevm file as I need, fire up the VM copies on my laptop, test whatever I need to test, then shut them down. Eventually I delete the copies and recover the disk space.

Depending on where my laptop is running I’ll get a completely random IP address for the VM from the local DHCP server. I would log into the consoles, get the IPs, then log into the various VMs from a terminal. (Cut and paste just works a whole lot better on a terminal than on the VMware console.)

However, since the console screens are up, and I repeat this pattern several times a week, I figured why not save a step and make the ephemeral VMs just show me their IP address on their consoles without having to login, so I added an “on reboot” file called /etc/cron.d/welcome on the master image which updates the /etc/issue file.

/etc/cron.d/welcome looks like this:

@reboot root (/bin/hostname; /bin/uname -a; echo; if [ -x /sbin/ip ]; then /sbin/ip addr; else /sbin/ifconfig; fi) > /etc/issue

When a new VM boots, it writes the hostname, kernel info, and the ethernet config to the /etc/issue file. /etc/issue is displayed on the screen before the login prompt, so now I can just glance at the console, see the IP address, and ssh to the new VM.

Ephemeral VM

Although you’d never want to do this on a production system, it works great for ephemeral, throw-away test VMs.

Hope you find this useful.

Mounting AWS EFS volumes inside Docker Containers

Amazon announced the development of the Amazon Elastic File System (AWS EFS) in 2015. EFS was designed to provide multiple EC2 instances with shared, low-latency access to a fully-managed file system. On June 28, 2016 Amazon announced that EFS is now available for production use in the US East (Northern Virginia), US West (Oregon), and Europe (Ireland) Regions.

Apcera‘s NFS Service Gateway can be used to access AWS EFS storage volumes within containers. You can use EFS to provide persistent storage to your containers running on AWS-hosted clouds in regions where EFS is available.

Gathering information

Before you begin you will need to know:

  • The name of the AWS Region where your Apcera Platform is running
  • The name/ID of the AWS VPC where your Apcera Platform is running
  • The name/ID of the AWS security group for your Apcera Platform

Setting up an EFS volume

  1. Log into your AWS console.
  2. Select the name of the AWS Region where your Apcera Platform is running on the upper right side of the screen.
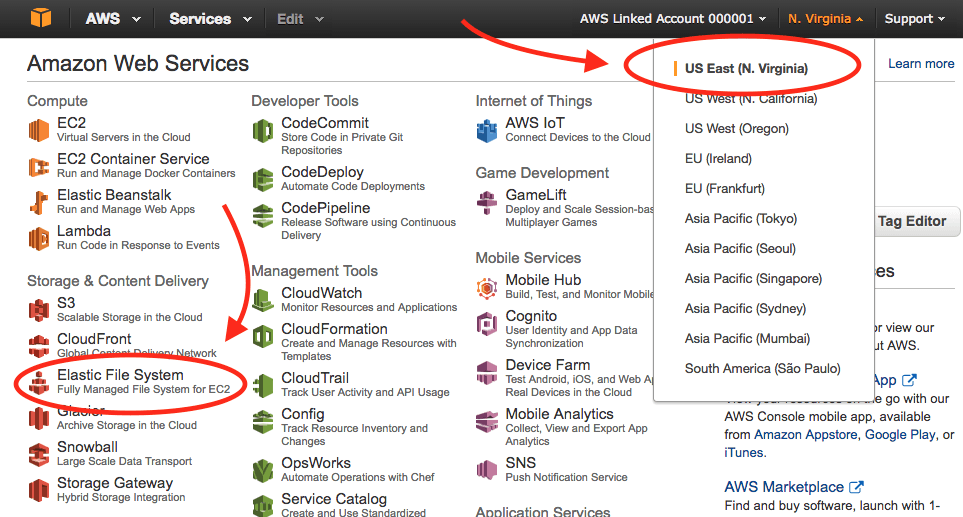
  3. Select Elastic File System.
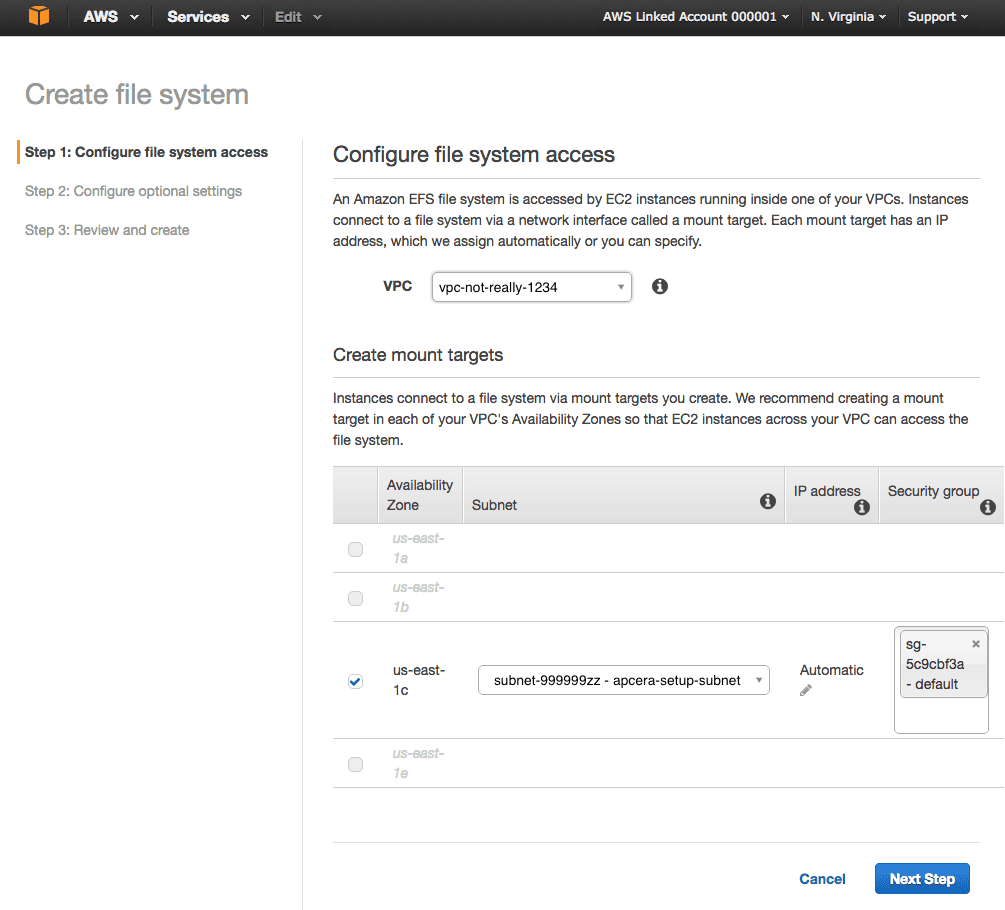
  4. Click Create File System.
  5. Configure the file system access:
    • Select the name of the VPC.
    • The availability zone and subnet should be selected for you automatically.
    • If your VPC has more than one subnet (unusual) then select the subnet containing the Instance Managers that will be connecting to the EFS volume.
    • Leave IP address set to Automatic.
    • The first EFS volume you create will create a new security group. Use that security group for this and all future EFS volumes. Write down the name of the new EFS security group – we’ll configure it in the next few steps.
    • Click Next Step
  6. Configure optional settings:
    • Set the name of the EFS volume.
    • Choose the performance mode.
    • Click Next Step
      mounting-aws-with-esf-inside-docker
  7. Review and create:
  8. If everything looks OK, click Create File System.
    mounting-aws-with-esf-inside-docker
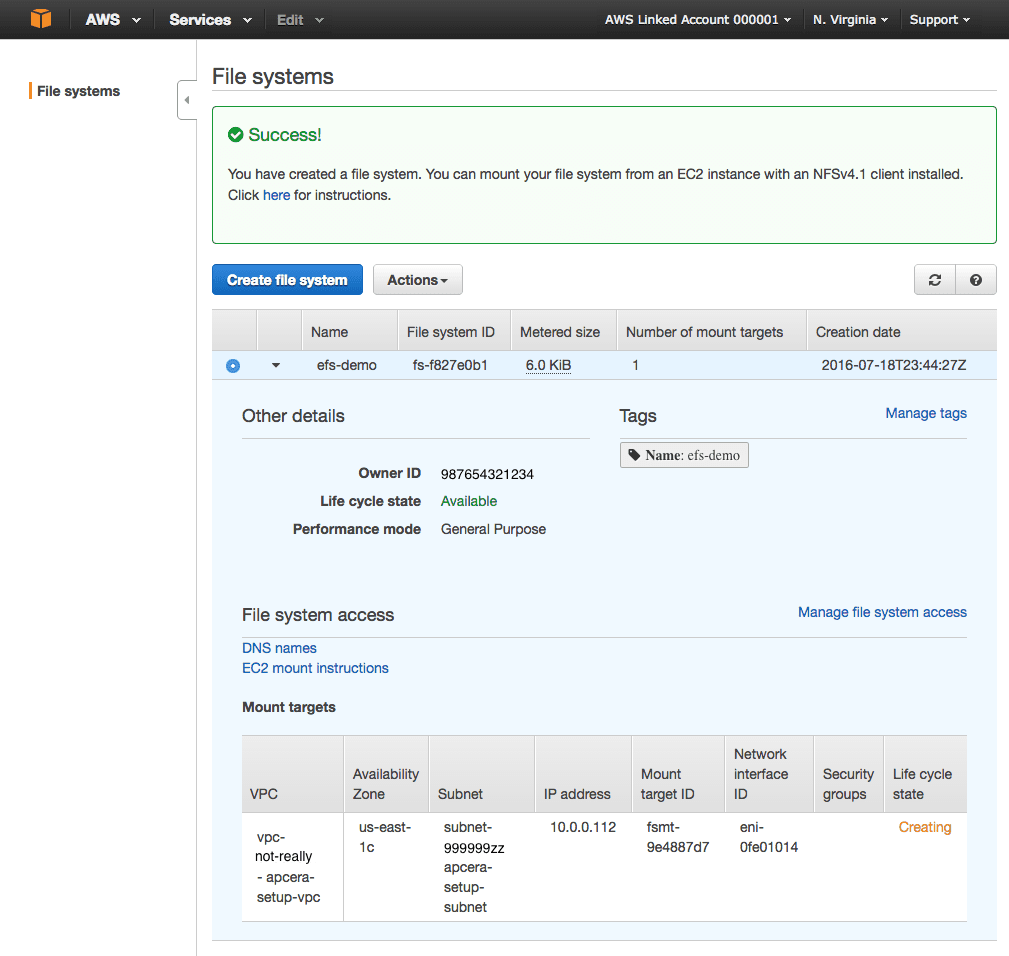
  9. You should see a “Success!” message and a new EFS volume with “Life Cycle State” = “Creating”.
  10. Write down the IP address of the EFS volume.

Update the EFS security group

  • Go back to the main console menu and select EC2.
  • Click Security Groups in the left hand nav menu.
  • Type the name of the new EFS security group into the search filter list.
  • On the bottom half of the screen delete the default inbound and outbound rules.
  • Add one inbound rule to allow all TCP traffic on port 2049 from the source “name/ID of the AWS security group for your Apcera Platform”
  • Add one outbound rule to allow all TCP traffic on port 2049 to the destination “name/ID of the AWS security group for your Apcera Platform”
  • This allows all VMs within your Apcera Platform security group to connect to your EFS volume on port 2049 (NFS).
  • No other traffic from any other source or to any other destination is allowed.|

Create an NFS Provider for the EFS volume

We’re going to create a single provider for the EFS volume. Each time you have a container or set of containers that need a persistent file system, just create a new service from the same provider. Each new service will carve out a new namespace on the EFS volume, keeping the files associated with that service separate from the files in all other services that use the same provider.

According to the EFS FAQ, When you create a file system, you create endpoints in your VPC called “mount targets.” Each mount target provides an IP address and a DNS name, and you use this IP address or DNS name in your mount command. Only resources that can access a mount target can access your file system. Since the Apcera Platform isn’t using Amazon DNS services internally, we’ll use the IP address to connect to the EFS volume.

To create the provider, you need to construct a URL describing the volume. In this case, we’ll use the internal IP address of the EFS volume as the hostname and / as the exported volume name. All EFS volumes use the NFS v4.1 protocol. If the IP address of the EFS volume is 10.0.0.112 we’d construct a provider using:

apc provider register awsefs --type nfs \
    --url "nfs://10.0.0.112/" \
    --description 'Amazon EFS' \
    --batch \
    -- --version 4.1

Create a service from the provider:

apc service create efs-service-1 \
    --provider awsefs \
    --description 'Amazon EFS Service' \
    --batch

Create a capsule, bind the service to the capsule, and connect to the capsule:

apc capsule create efs-capsule1 --image linux -ae --batch
apc service bind efs-service-1 --job efs-capsule1 \
    --batch -- --mountpath /an/unlimited/supply
apc capsule connect efs-capsule1

Once connected, type df -k to see the mounted file system.

You can bind this service to any container that needs a shared, persistent file system. Each time you need a new shared, persistent file system for a container or group of containers just create a new service using the same provider and bind the service to your job or jobs.

Persistence for Docker

Now that we have a provider that can carve out EFS storage for containers, let’s try spinning up some Docker images.

On the Apcera Platform, if the specification for a Docker image (Dockerfile) specifies that the app requires persisted volumes, you must do one of the following when creating the job:

  • Include the –provider flag when you create or run the Docker job. You must include this flag if you include the –volume flag when creating or running the Docker job.
  • Include the –ignore-volumes flag when you create or run the Docker job.

Here is an example of running NGINX inside a Docker container on the Apcera platform, where the content for the site is stored on an EFS volume:

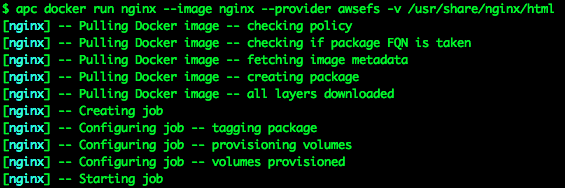
I’m using the Apcera “apc” command-line tool to build the container, pulling the nginx image directly off hub.docker.com, telling it to use the awsefs EFS volume provider I created earlier for persistence, and to mount the EFS volume at the mount point “/usr/share/nginx/html”.

Now connect to the container:

/proc/mounts contains a list of all of the container’s mount points. I can verify that the container does indeed have an EFS volume by grepping /proc/mounts for the mount point:

Grepping for “/usr/share/nginx/html” shows the IP address 10.0.0.112, which is the IP of the EFS volume, the log directory name after is the unique namespace for the service, the mountpoint is “/usr/share/nginx/html”, and the mount type “nfs4”.

There is no content in the directory, so I add some by echoing some HTML code to an index.html file. My container will proclaim to the world “NGINX in a Docker container on Apcera with content stored on EFS” in an H3 typeface!

Now that I have some content I need to add a route to the content. Right now the NGINX container is running, and listening on ports 80 and 443, but it’s completely isolated from the outside world — no one can connect to those ports unless there’s a route (a URL) set up.

My cluster is running on the domain earlruby.apcera-platform.io, so I add a route like so:

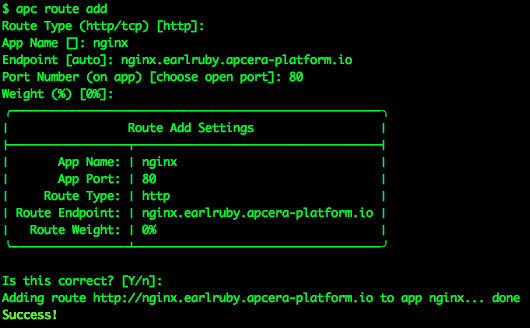
I have successfully added the http route http://nginx.earlruby.apcera-platform.io/ to my NGINX container. This is a real public DNS entry. To verify that it works I point my browser at the route I just added:

Success!

Such an amazing app is bound to go viral, and a single NGINX container may not be able to keep up with the load. I want to ensure that my app can keep up and remain highly-available, and that it keeps running even if one or more VMs in my cluster get killed off, so I add more NGINX containers:

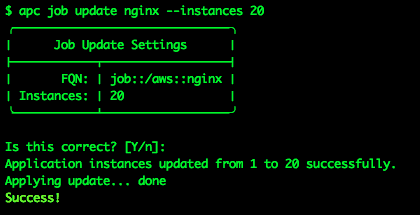
Now I’ve got 20 containers running my NGINX app, all serving up the same content, running on multiple VMs across my cluster, all load-balanced under the single URL http://nginx.earlruby.apcera-platform.io/. If any container gets killed off, the Apcera platform will spin up a new one. If any VM in the cluster dies, any containers running on it will automatically be migrated to new hosts. If I want to scale up the app to 100 or 1000 containers, or back down to 1, it’s a one-line command to make the change.

In terms of resources, I’m using slightly less than 45 MiB to run those 20 containers. That’s not a typo — 45MiB! Containers are much more efficient users of RAM than VMs.

I hope you find this useful.

This article originally appeared as an Apcera blog post on July 21, 2016.