Installing Skype on Ubuntu 9.04 using Synaptic

Want to make free phone calls using Skype? Running Ubuntu 9.04? Want to make sure that Skype stays up-to-date with the latest security patches and updates once you install it? Here’s how:

On the Skype Download for Linux page Skype lists Ubuntu 7.04-8.04 as the only supported versions of Ubuntu. You can install Skype on Ubuntu 9.04, but when new updates or security fixes come out you won’t get an automatic update. If you want to make sure that your Skype installation stays up-to-date you should add skype.com as a valid software repository and install Skype from that. If you do this you’ll automatically get updates when they’re available.

To add skype.com as a repository:

  • Start up Synaptic Package Manager. (On Gnome go to System > Administration > Synaptic Package Manager)
  • Select Settings > Repositories
  • Click the Third-Party Software tab
  • Click Add
  • Enter “deb http://download.skype.com/linux/repos/debian/ stable non-free” as the APT line
  • Click the Reload button in the upper left-hand corner to download the list of available files from download.skype.com
  • Type “skype” in the Quick Search box and you should see Skype listed as an installable package
  • Mark it for installation and install

Skype should now appear on your Applications > Internet menu.


Update: At the time that I wrote this the instructions worked. However, it looks as if Skype has removed their apt repositories for 9.04. If you attempt to connect to http://download.skype.com/linux/repos/debian/ you’ll get a “Hi, this page is off limits” error message.

If you are running Ubuntu 10.04 or later you can get Skype directly from Canonical. See https://help.ubuntu.com/community/Skype for more info.

Getting ActiveScaffold to work under Ruby on Rails 2.3

I had started an application using Ruby on Rails and I wanted to try out ActiveScaffold as a replacement for standard scaffolding. I’d seen ActiveScaffold in action before but I’d never used it. I knew that ActiveScaffold dynamically generates application pages using a standard format, and if you change the format it updates all of your application’s pages — unlike standard scaffolding where you have to tweak each and every page. For the application I’m working on it sounded like a huge time-saver, so I decided to try it out.

I was trying to install ActiveScaffold for Ruby on Rails using the steps shown on the Active Scaffold – Getting Started tutorial. However, when I installed ActiveScaffold using the instructions the Mongrel web server I use for development would die as soon as I tried to restart it, dumping a large list of errors:

earl@earl:~/projects/TotalWorldDomination > script/server
=> Booting Mongrel
=> Rails 2.3.2 application starting on http://0.0.0.0:3000
/usr/lib/ruby/gems/1.8/gems/activesupport-2.3.2/lib/active_support/core_ext/
module/aliasing.rb:33:in `alias_method': undefined method `_pick_template' 
for class `ActionView::Base' (NameError)
        from /usr/lib/ruby/gems/1.8/gems/activesupport-2.3.2/lib/active_support/
core_ext/module/aliasing.rb:33:in `alias_method_chain'

… and the error messages continued, filling up the entire screen.

I quickly figured out that the problem was that I was using Rails 2.3.2, and the release version of ActiveScaffold was for Rails 2.2.x. The tutorial was for Rails 2.2.x, not 2.3.x.

Since I’d just commited all of my changes to my Subversion repository before installing ActiveScaffold I reverted to the previous version of my application, removing any files installed by ActiveScaffold.

I checked the README for ActiveScaffold on GitHub and installed the following branches:

script/plugin install git://github.com/activescaffold/active_scaffold.git -r master
script/plugin install git://github.com/ewildgoose/render_component.git -r rails-2.3

After that Mongrel loads just fine:

earl@earl:~/projects/TotalWorldDomination > script/server
=> Booting Mongrel
=> Rails 2.3.2 application starting on http://0.0.0.0:3000
=> Call with -d to detach
=> Ctrl-C to shutdown server

Following the tutorial I added this to my layout:

<%= javascript_include_tag :defaults %>
<%= active_scaffold_includes %>

And I added this to one of my controllers (just so I could test out ActiveScaffold with one model):

  layout "admin"
  active_scaffold

At this point if I try to pull up a view for the controller I just modified I get a “Template is missing – Missing template admin.erb in view path vendor/plugins/active_scaffold/frontends/default/views” error.

Active Scaffold - missing admin view

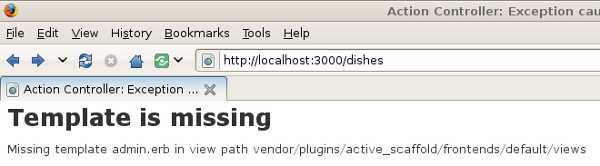
This error is misleading, since (checking GitHub) there are no admin.* files in active_scaffold/frontends/default/views in any of the four ActiveScaffold branches. It’s not a view that comes built into ActiveScaffold, even though the tutorial makes it sound like a built-in layout, it’s the name of a layout file for your application.

In my case the layout that I’d modified in the previous step was application.html.erb, and it was the only layout in my small application. I made a copy of the file named admin.html.erb:

cd app/views/layouts
cp application.html.erb admin.html.erb

Then following advice I found in the ActiveScaffold forums I commented out everything in all of my standard-scaffold-generated controllers, leaving only the lines:

  layout "admin"
  active_scaffold

… in between the “class” and “end” lines for each controller.

Once I did that ActiveScaffold worked fine.

One note: If you do get any “Request Failed (code 500, Internal Error)” errors, check log/development.log for hints about what’s going on, it’ll usually tell you what the problem is.

Hope you found this useful.

Samsung SSD drives achieve 2GB/s write speeds

I spend a fair amount of my time administering large databases and trying to squeeze the maximum speed out of computer hardware. The types of databases I work on are typically in the 1-2TB range and the disks that they run on have to support a mix of bulk writes, bulk deletes, random writes and random reads. Some of the systems I work on can burst at up to 500MB/s and sustain random write speeds of 250MB/s. Your typical SATA2 drive for home use supports a maximum sequential write speed of around 60MB/s, and they run slower still when doing lots of random IO, so getting 250MB/s sustained random write speeds requires some special hardware.

This is why I was so impressed with a demo I saw of the new Samsung SSD (solid state drive). Since these drives are solid state — no moving parts — they have 220MB/s sequential read and 200MB/s sequential write speeds. If you tie a bunch of them together in a RAID configuration you can speed writes up even more, which is what the guy in the video below did. The end result was a desktop server that could read and write sequential data at 2GB/s.

Usually when I see demos like this the caveat is that the total amount of space available is 80MB or so. Not the case here. These new drives are 256GB each, and the RAID array built below has a total capacity of 6TB.

Check this out. If you’re into high-speed hardware using off-the-shelf parts, this is just incredible.

One thing to note, the demo does not show random read/write speeds. All of the guy’s demonstrations are of sequential IO speed. This is significant, because in the past SSD drives slow down significantly if they’re asked to do random IO, and you want lots of speed for random IO if you want to use these drives for database applications.

Upgrading Blu-ray Player Firmware from Linux

I’ve got an older Sony Blu-ray player, a BDP-S300 model. I was trying to watch Burn After Reading tonight and the movie would not start. Not because the disc was damaged, but because it had some embedded software that didn’t work with the Blu-ray player’s old firmware — software that it used to START PLAYING THE MOVIE.

So I went to Google, typed in “Sony Blu-ray BDP-S300 firmware download” and found links to the usual suspects, Blu-ray.com and esupport.sony.com. Both sites have the latest firmware for Blu-ray players. Both have the software in an ISO CD-ROM image format, so you can burn a CD-ROM with the firmware, boot your Blu-ray player with the CD, and in 10 to 20 minutes the firmware has been upgraded. (Yes, 10-20 minutes. The firmware update process is even slower than the painfully, glacially slow disc load time for Sony Blu-ray players.)

The only problem is that both sites compress the ISO file into a Windows-based EXE file! Apparently the people at Sony don’t realize that there are people out there with Macs, so Mac users are screwed. They also don’t appear to realize that they could make the same file available as a plain ISO file and ANYONE with ANY OS with an ISO CD-burning software package and a CD-ROM burner (pretty much every personal computer made in the last 15 years) could make a CD-ROM from the file.

I have no Windows box at the moment, I do most everything on Linux, so after firing off a customer feedback letter to Sony slamming them for their short-sightedness I went ahead and clicked the pull-down menu that tells their site that yes, I was using Windows 2000, please let me download the damn file, and I downloaded UPDATE_BDPS300_VER0450.EXE.

After that it was a matter of typing:

apt-get install wine
mkdir ~/tmp/bluray
wine UPDATE_BDPS300_VER0450.EXE

A pop-up box asked me where to put the files it was about to extract from UPDATE_BDPS300_VER0450.EXE, so I clicked the Browse button and selected ~/tmp/bluray. A few seconds later UPDATE_BDPS300_VER0450.ISO was in the ~/tmp/bluray directory. I fired up K3b, clicked on the left-side file menu tree to get to ~/tmp/bluray, double-clicked the UPDATE_BDPS300_VER0450.ISO file, and burned the CD-ROM.

I stuck the CD-ROM in the Blu-ray player and about 15 minutes later the player spit the disc back out.

Now I can watch the movie…

Renaming a CVS Branch

I recently needed to rename a branch in a CVS repository, and after Googling around for a while I found only hints of what might work, but no actual examples of how to rename a branch. Apparently it’s one thing to rename a tag in CVS, but if it’s a branch tag CVS doesn’t give you any easy ways to rename the branch, and if you try “normal” rename commands on a branch tag you’ll start seeing cryptic error messages. I started fiddling around with some of the commands in a CVS sandbox and figured out how to do it.

If you give a branch the wrong name you can fix the name by adding the good name as a tag name on the same branch, changing your working version to the good name, then deleting the old tag, and finally converting the new tag into a branch tag.

Whoops! I created a bad tag name:

earl@earl:~/sandbox/earl > cvs tag -b bad_name cvs_test.pl
T cvs_test.pl

earl@earl:~/sandbox/earl > cvs up -r bad_name cvs_test.pl
M cvs_test.pl

earl@earl:~/sandbox/earl > cvs ci cvs_test.pl
/cvsroot/sandbox/earl/cvs_test.pl,v  <--  cvs_test.pl
new revision: 1.1.2.1; previous revision: 1.1

earl@earl:~/sandbox/earl > cvs stat cvs_test.pl
===================================================================
File: cvs_test.pl       Status: Up-to-date

   Working revision:    1.1.2.1
   Repository revision: 1.1.2.1 /cvsroot/sandbox/earl/cvs_test.pl,v
   Commit Identifier:   21af497a241a4567
   Sticky Tag:          bad_name (branch: 1.1.2)
   Sticky Date:         (none)
   Sticky Options:      (none)

To fix that, I tag the working revision (in this case 1.1.2.1) of the bad_name branch with the good_name and then switch to the good_name branch:

earl@earl:~/sandbox/earl > cvs admin -N good_name:1.1.2.1
cvs admin: Administrating .
RCS file: /cvsroot/sandbox/earl/cvs_test.pl,v
done

earl@earl:~/sandbox/earl > cvs stat cvs_test.pl
===================================================================
File: cvs_test.pl       Status: Up-to-date

   Working revision:    1.1.2.1
   Repository revision: 1.1.2.1 /cvsroot/sandbox/earl/cvs_test.pl,v
   Commit Identifier:   21af497a241a4567
   Sticky Tag:          bad_name (branch: 1.1.2)
   Sticky Date:         (none)
   Sticky Options:      (none)

earl@earl:~/sandbox/earl > cvs up -r good_name cvs_test.pl
earl@earl:~/sandbox/earl > cvs stat cvs_test.pl
===================================================================
File: cvs_test.pl       Status: Up-to-date

   Working revision:    1.1.2.1
   Repository revision: 1.1.2.1 /cvsroot/sandbox/earl/cvs_test.pl,v
   Commit Identifier:   21af497a241a4567
   Sticky Tag:          good_name (revision: 1.1.2.1)
   Sticky Date:         (none)
   Sticky Options:      (none)

Next I delete the bad_name tag by using the -n option without specifying a revision number:

earl@earl:~/sandbox/earl > cvs admin -n bad_name
cvs admin: Administrating .
RCS file: /cvsroot/sandbox/earl/cvs_test.pl,v
done

earl@earl:~/sandbox/earl > cvs stat cvs_test.pl
===================================================================
File: cvs_test.pl       Status: Up-to-date

   Working revision:    1.1.2.1
   Repository revision: 1.1.2.1 /cvsroot/sandbox/earl/cvs_test.pl,v
   Commit Identifier:   21af497a241a4567
   Sticky Tag:          good_name (revision: 1.1.2.1)
   Sticky Date:         (none)
   Sticky Options:      (none)

earl@earl:~/sandbox/earl > cvs up -r bad_name cvs_test.pl
cvs update: `cvs_test.pl' is no longer in the repository

The bad tag name is gone! To get the good tag again:

earl@earl:~/sandbox/earl > cvs up -r good_name cvs_test.pl
U cvs_test.pl

earl@earl:~/sandbox/earl > cvs stat cvs_test.pl
===================================================================
File: cvs_test.pl       Status: Up-to-date

   Working revision:    1.1.2.1
   Repository revision: 1.1.2.1 /cvsroot/sandbox/earl/cvs_test.pl,v
   Commit Identifier:   21af497a241a4567
   Sticky Tag:          good_name (revision: 1.1.2.1)
   Sticky Date:         (none)
   Sticky Options:      (none)

The last step is to convert the good_name tag into a branch tag:

earl@earl:~/sandbox/earl > cvs tag -d good_name cvs_test.pl
D cvs_test.pl

earl@earl:~/sandbox/earl > cvs tag -b good_name cvs_test.pl
T cvs_test.pl

earl@earl:~/sandbox/earl > cvs up -r good_name cvs_test.pl

earl@earl:~/sandbox/earl > cvs ci cvs_test.pl
/cvsroot/sandbox/earl/cvs_test.pl,v  <--  cvs_test.pl
new revision: 1.1.2.1.2.1; previous revision: 1.1.2.1

There may be an easier way to do this, but this does work.

Hope you found this useful.