post

Automatically decrypt multiple LUKS-encrypted volumes

I’ve written in the past on Adding an external encrypted drive with LVM to Ubuntu Linux and Adding a LUKS-encrypted iSCSI volume to Synology DS414 NAS but I neglected to mention how to automatically decrypt additional volumes.

When installing a fresh copy of Ubuntu one of the options is to install with a LUKS-encrypted Logical Volume Manager Volume Group (LVM VG). This puts your root volume on the encrypted LVM VG. When you power up your machine Ubuntu prompts you to enter the decryption passphrase in order to decrypt the VG and start your computer. Without the passphrase the contents of your hard drive are unreadable.

If you add encrypted external drives and/or additional VGs you will end up with multiple encrypted volumes. Ubuntu will prompt you for the passphrase of each additional encrypted volume when you boot up the machine.

If you don’t want to enter multiple, different passphrases each time you boot, you can store the passphrases for additional volumes on the encrypted root filesystem of your first drive using the /etc/crypttab file. You’ll just be prompted for one passphrase, of the first VG, and that decrypts the passphrases needed to decrypt the additional volumes.

Here’s how it works.

The /etc/crypttab file contains 4 fields per line: the name of the encrypted volume, a UUID identifying the storage device, the name of a file with the decryption passphrase, and encryption options.

nvme0n1p5   UUID=405d8c73-1cf9-4b2c-9b8e-c76b90d27c67 none                        luks,discard
datastorage UUID=f2d73ac8-1ef1-4735-9dd4-9e778fc9e781 /root/.luks-datastorage     luks,discard
external1   UUID=0140476b-dd0b-4aab-b7d4-2f5fa14d1a0c /root/.luks-backupexternal1 luks
external2   UUID=610a67d4-c4f6-4b73-a824-a437971e8d24 /root/.luks-backupexternal2 luks
iscsi       UUID=b106b749-f4ab-44be-8962-6ff867dc074e /root/.luks-backupiscsi     luks

The first volume, nvme0n1p5, is the encrypted boot volume. It contains the root filesystem and the /root home directory. The third field is “none” which means that Ubuntu will prompt you for a decryption passphrase in order to unlock and decrypt the drive.

The remaining volumes have files defined that contain the decryption passphrase for each volume. Those files are hidden files in the /root home directory. Once the nvme0n1p5 volume is decrypted and mounted, the remaining volumes are automatically decrypted using the passphrases stored in the hidden files.

The end result is that all of your drives are encrypted, but you only have to enter one passphrase to unlock all of your drives.

Hope you find this useful.

post

Too many authentication failures

I was working with a new Linux distro and after creating a brand-new VM with a single login I attempted to ssh into the VM only to be greeted with:

Received disconnect from 10.0.0.180 port 22:2: Too many authentication failures
Disconnected from 10.0.0.180 port 22

It was a new VM, and I hadn’t loaded an ssh key (there was no option to do so in the install). I’d set up a user and password, so I expected to get a password prompt. I didn’t get to a password prompt, just an immediate disconnect.

I used ssh -vvv to connect and found that my ssh client was attempting to use my ssh keys, as ssh is supposed to, and on the third key the VM spat back the error:

Received disconnect from 10.0.0.180 port 22:2: Too many authentication failures
Disconnected from 10.0.0.180 port 22

Well, I wanted to connect with a password anyhow, so I tried:

ssh -o PubkeyAuthentication=no username@10.0.0.180

I was greeted with a password: prompt.

I checked the /etc/ssh/sshd_config and found that someone who’d built the install image had changed the default setting for MaxAuthTries from 6 to 2.

The MaxAuthTries setting tells the ssh daemon how many different authentication attempts a user can try before it disconnects. Each ssh key loaded into ssh-agent counts as one authentication attempt. The default is 6 because many users (like me) have multiple ssh keys loaded into ssh-agent so that we can automatically log into different hosts that use different ssh keys. Trying more than one ssh key isn’t the same as thumb-fingering a password — ssh is designed to allow for multiple key attempts. After the ssh connection attempts all of your ssh keys and you haven’t run out of attempts and passwords are enabled you’ll eventually get a password prompt.

Setting MaxAuthTries back to the more reasonable default of 6 and reloading the sshd daemon fixed the issue. Apparently whoever tested the setup only has one ssh key and wasn’t aware of what changing the MaxAuthTries setting does when people with more than one key attempt to log in.

Alternatively, if it’s someone else’s server and you can’t change the /etc/ssh/sshd_config file, you can also add these lines to your local ~/.ssh/config file:

Host 10.0.0.180
    PubkeyAuthentication no

If you’re concerned about ssh security sshd_config allows you to control what versions of the ssh protocol are supported, which ciphers you trust (or don’t trust), and to tune other settings that lock down what you will or won’t allow ssh to do in your environment. It may be that for some applications in some environments setting MaxAuthTries 2 makes sense, but using it for an out of the box installation just breaks ssh for no good reason.

Hope you find this useful.

Adding a LUKS-encrypted iSCSI volume to Synology DS414 NAS and Ubuntu 15.04

I have an Ubuntu 15.04 “Vivid” workstation already set up with LUKS full disk encryption, and I have a Synology DS414 NAS with 12TB raw storage on my home network. I wanted to add a disk volume on the Synology DS414 that I could mount on the Ubuntu server, but NFS doesn’t support “at rest” encrypted file systems, and using EncFS over NFS seemed like the wrong way to go about it, so I decided to try setting up an iSCSI volume and encrypting it with LUKS. Using this type of setup, all data is encrypted both “on the wire” and “at rest”.

Log into the Synology Admin Panel and select Main Menu > Storage Manager:

  • Add an iSCSI LUN
    • Set Thin Provisioning = No
    • Advanced LUN Features = No
    • Make the volume as big as you need
  • Add an iSCSI Target
    • Use CHAP authentication
    • Write down the login name and password you choose

On your Ubuntu box switch over to a root prompt:

sudo /bin/bash

Install the open-iscsi drivers. (Since I’m already running LUKS on my Ubuntu box I don’t need to install LUKS.)

apt-get install open-iscsi

Edit the conf file

vi /etc/iscsi/iscsid.conf

Edit these lines:

node.startup = automatic
node.session.auth.username = [CHAP user name on Synology box]
node.session.auth.password = [CHAP password on Synology box]

Restart the open-iscsi service:

service open-iscsi restart
service open-iscsi status

Start open-iscsi at boot time:

systemctl enable open-iscsi

Now find the name of the iSCSI target on the Synology box:

iscsiadm -m discovery -t st -p $SYNOLOGY_IP
iscsiadm -m node

The target name should look something like “iqn.2000-01.com.synology:boxname.target-1.62332311”

Still on the Ubuntu workstation, log into the iSCSI target:

iscsiadm -m node --targetname "$TARGET_NAME" --portal "$SYNOLOGY_IP:3260" --login

Look for new devices:

fdisk -l

At this point fdisk should show you a new block device which is the iSCSI disk volume on the Synology box. In my case it was /dev/sdd.

Partition the device. I made one big /dev/sdd1 partition, type 8e (Linux LVM):

fdisk /dev/sdd

Set up the device as a LUKS-encrypted device:

cryptsetup --verbose --verify-passphrase luksFormat /dev/sdd1

Open the LUKS volume:

cryptsetup luksOpen /dev/sdd1 backupiscsi

Create a physical volume from the LUKS volume:

pvcreate /dev/mapper/backupiscsi

Add that to a new volume group:

vgcreate ibackup /dev/mapper/backupiscsi

Create a logical volume within the volume group:

lvcreate -L 1800GB -n backupvol /dev/ibackup

Put a file system on the logical volume:

mkfs.ext4 /dev/ibackup/backupvol

Add the logical volume to /etc/fstab to mount it on startup:

# Synology iSCSI target LUN-1
/dev/ibackup/backupvol /mnt/backup ext4 defaults,nofail,nobootwait 0 6

Get the UUID of the iSCSI drive:

ls -l /dev/disk/by-uuid | grep sdd1

Add the UUID to /etc/crypttab to be automatically prompted for the decrypt passphrase when you boot up Ubuntu:

backupiscsi UUID=693568ca-9334-4c19-8b01-881f2247ae0d none luks

If you found this interesting, you might want to check out my article Adding an external encrypted drive with LVM to Ubuntu Linux.

Hope you found this useful.

Use Web of Trust (WOT) to thwart scammy web sites

My friend Shannon Phillips recently updated her Facebook status with:

Word to travelers: do not book hotel rooms through TripAdvisor. They will funnel you through sketchy third-party sites (“Amoma” is the one who burned me) who advertise made-up rates, take your money, and then get back in touch two weeks later to tell you oopsie, they can’t make a reservation at that hotel after all.

I guess it’s a nice scam while it lasts, but in this age of networked, instant word-of-mouth reviews, that kind of business model won’t hold up long.

I suggested Shannon try installing the Web of Trust (WOT) plug-in for her browser. I use it in all of mine, and it’s stopped scam sites from being loaded into my browser.

WOT works for the web like Waze works for driving. Here’s the explanation from the Web of Trust home page:

WOT displays a colored traffic light next to website links to show you which sites people trust for safe searching, surfing and shopping online: green for good, red for bad, and yellow as a warning to be cautious. The icons are shown in popular search engine results, social media, online email, shortened URL’s, and lots of other sites.

The cool part is, the rating is based on the aggregate ratings of all of the people who use a plug-in. Get burned by a site? Click the WOT icon and rate the site as untrustworthy. Have an excellent experience? Click the WOT icon and rate the site as trustworthy. The more that people use it, the more accurate and reliable the ratings become.

If a site is really untrustworthy, WOT will stop your browser from loading the site unless you tell it that you really want to go to that site. You can still go anywhere you want, but you’ll be warned about sites that others have had problems with.

post

Peerio promises privacy for everyone

A new company called Peerio is promising secure, easy messaging and file sharing for everyone. They’re building apps that encrypt everything you send or share, making the code for these apps open source, and paying for security audits to peer-review the source code, looking for security weaknesses.

They’ve put together a short video to explain the basics of what they offer. I thought I’d give it a try and see how it works.

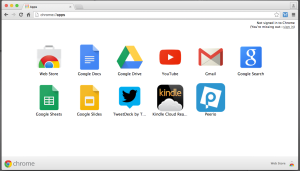
I went to Peerio.com using the Chrome browser, so the home page automatically offered to install Peerio on Chrome.

I clicked the install button and Peerio popped up as a new Chrome app.

peerio-on-chrome

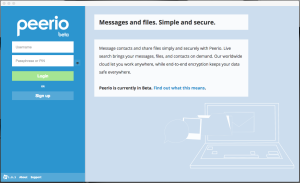
Clicking the app brought up the new account screen, with the word “beta” displayed in small type just under the company logo, so they’re letting me know up front that this is going to be a little rough.

peerio-sign-up

I clicked Sign Up, added a user name and email address, and was prompted for a pass phrase.

I have a couple of pass phrases I use. I typed one in, but apparently it wasn’t long enough. I tried another and another. Not long enough. The words “ALMOST THERE. JUST A FEW MORE LETTERS…” appeared on screen. One phrase I typed in had 40+ letters in it, but still the words “ALMOST THERE. JUST A FEW MORE LETTERS…” persisted. Tried again, this time putting spaces between the words. Phrase accepted! Maybe the check is trying to verify the number of space-separated words, not the total number of characters? Anyhow, got past that hurdle.

Next it sends you an email with a confirmation code and gives you 10 minutes (with a second by second countdown) to enter the confirmation code. I guess if you don’t enter it within 10 minutes your account is toast?

Once past that step I was prompted to create a shorter PIN code that can be used to login to the site. The long pass phrase is only needed to log in the first time you use a new device, after that your PIN can be used. I tried entering a few short number sequences. All were rejected as “too weak” so I used a strong, unique password with a mix of upper and lowercase letters, numbers, and special characters. The screen hid what I was typing and only asked for the PIN once, so if I thumb-fingered it, my account was going to be rendered useless pretty quickly. Hopefully I typed what I thought I typed.

peerio-all-set-up

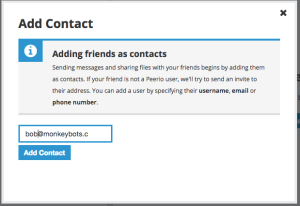
Of course to use the service to send messages to people you have to load your contacts in. I added a friend’s email and Peerio sent him an invite. Tried adding another email address and the “Add Contact” form cut me off at the “.c” in “.com” — looks like the folks at Peerio only let you have friends with email addresses that are less than 16 characters long. My friends at monkeybots.com, you’re out of luck.

peerio-add-contact

The Contacts tab has sub-tabs for “All Contacts”, “Confirmed Contacts”, and “Pending Contacts”, but the one email address I entered that was less than 16 characters long didn’t show up anywhere (I expected to see it under “Pending Contacts”). With my entries disappearing or truncated, I stopped trying to use the system.

It’s an interesting idea for a service, the source code for the clients is supposed to be available on Github, but the Peerio.com site directed me to https://github.com/TeamPeerio for the source, and that link is 404. Searching Github for “Peerio” shows https://github.com/PeerioTechnologies/peerio-client and https://github.com/PeerioTechnologies/peerio-website, so it looks like this is just a case of a BETA web site with a broken link.

Before the developers pay for another security audit, they really ought to try doing some basic usability testing — set up a new user in front of a laptop, and make two videos — one of the keyboard and screen and one of the user’s face, and then watch them try to log in and set up an account. I think they’d find the experience invaluable.

Anyhow, if you’re interested and feel like trying out their very BETA (feels like ALPHA) release, head over to Peerio.com and sign up. If you want to send me a message, you can reach me on Peerio as “earl”.