post

Updating local IDRAC passwords on Dell hosts using Ansible

Dell hosts have the ability to add multiple local users to the Integrated Dell Remote Access Controller (iDRAC) with different levels of access.

Each IDRAC user has an Account ID number 1 through 2^8. If you have an datacenter operations team that needs admin access, developers that need to check BIOS settings, and automation scripts that need to update firmware, you need to agree on which Account ID you want to use for what task and then assign a user name and password to that Account ID.

You also want to have a root account with admin access that you use to update the other accounts. Setting up the root account and not giving that login and password out to anyone else allows you to manage all of the other accounts. Having two accounts with admin access means you can use root to update the admin account’s password and the admin account can update the root password.

We’ll use the Ansible community.general.redfish_command module to set passwords. This module uses the Dell Redfish API to interact with IDRAC. The Ansible playbook update passwords looks like this:

---
# ansible/roles/idrac_host/tasks/main.yml

- name: Update IDRAC Passwords
  delegate_to: localhost
  become: False
  block:

  # Create the ILO users and update their passwords
  - name: Use the root account to add and enable the devops user
    community.general.redfish_command:
      category: Accounts
      command: AddUser,EnableUser
      baseuri: "{{ inventory_hostname }}.{{ subdomain }}"
      username: "{{ ilo_root_user_name }}"
      password: "{{ ilo_root_initial_password }}"
      account_id: "{{ ilo_devops_id }}"
      account_username: "{{ ilo_devops_user_name }}"
      account_password: "{{ ilo_devops_password }}"
      roleid: "Administrator"

  - name: Use the root account to set the password of the devops user
    community.general.redfish_command:
      category: Accounts
      command: UpdateUserPassword
      baseuri: "{{ inventory_hostname }}.{{ subdomain }}"
      username: "{{ ilo_root_user_name }}"
      password: "{{ ilo_root_initial_password }}"
      account_username: "{{ ilo_devops_user_name }}"
      account_password: "{{ ilo_devops_password }}"

  - name: Update root user password (if needed)
    community.general.redfish_command:
      category: Accounts
      command: UpdateUserPassword
      baseuri: "{{ inventory_hostname }}.{{ subdomain }}"
      username: "{{ ilo_root_user_name }}"
      password: "{{ ilo_root_initial_password }}"
      account_username: "{{ ilo_root_user_name }}"
      account_password: "{{ ilo_root_password }}"
    when: ilo_root_initial_password != ilo_root_password

  - name: Use the devops account to add and enable the os_deploy user
    community.general.redfish_command:
      category: Accounts
      command: AddUser,EnableUser
      baseuri: "{{ inventory_hostname }}.{{ subdomain }}"
      username: "{{ ilo_devops_user_name }}"
      password: "{{ ilo_devops_password }}"
      account_id: "{{ ilo_os_deploy_id }}"
      account_username: "{{ ilo_os_deploy_user_name }}"
      account_password: "{{ ilo_os_deploy_password }}"
      roleid: "Administrator"

  - name: Use the devops account to set the password of the os_deploy user
    community.general.redfish_command:
      category: Accounts
      command: UpdateUserPassword
      baseuri: "{{ inventory_hostname }}.{{ subdomain }}"
      username: "{{ ilo_devops_user_name }}"
      password: "{{ ilo_devops_password }}"
      account_username: "{{ ilo_os_deploy_user_name }}"
      account_password: "{{ ilo_os_deploy_password }}"

This playbook uses the root account to create a devops account (if it does not exist), then updates the password of the devops account (if it needs to be updated), updates the root password (if it changed), and creates an os_deploy user to use for automation tasks.

This sets up all three as administrator accounts, but other security roles are available.

All of the variables are stored in the ansible/roles/idrac_host/vars/main.yml file and are encrypted using Ansible vault, so you can store your playbooks in Git without worrying about password leakage.

---
# ansible/roles/idrac_host/vars/main.yml

subdomain: dc.example.com

ilo_root_id: '1'
ilo_root_user_name: 'root'
ilo_root_initial_password: !vault |
          $ANSIBLE_VAULT;1.1;AES256
          23437326137343536343735666633656266326666353366643633
          31326331613538303739623164313338396365666362623166613
          38336262306666646531663034333338396233363261323039430
          3261
ilo_root_password: "{{ ilo_root_initial_password }}"

ilo_devops_id: '3'
ilo_devops_user_name: 'devops'
ilo_devops_password: !vault |
          $ANSIBLE_VAULT;1.1;AES256
          3163633564663962303270a303335353435396337393931643032
          3064303161616239390a333865376133346539333233365313566
          30383466656665643661564306330393461326438303332636633
          3255


ilo_os_deploy_id: '4'
ilo_os_deploy_user_name: 'os_deploy'
ilo_os_deploy_password: !vault |
          $ANSIBLE_VAULT;1.1;AES256
          30383466656665643661373923164626564306338303332636633
          3163633563346466396230a303335353435396337393931643032
          30643039390a33386332343437632333535393136363565313566
          3262

If you want to update the root password, change ilo_root_password, run the playbook on all hosts to update the root password, then set ilo_root_initial_password to the new (encrypted) root password and set ilo_root_password back to "{{ ilo_root_initial_password }}".

Hope you find this useful.

Want to learn Ansible? Start on the Ansible Community Documentation page and just start automating your environment. Want to level-up your Ansible skills? I highly recommend the O’Reilly book Ansible: Up and Running.

post

Updating ESXi root passwords and authorized ssh keys with Ansible

I manage a number of vCenter instances and a lot of ESXi hosts. Some of the hosts are production, some for test and development. Sometimes an ESXi host needs to be used by a different group or temporarily moved to a new cluster and then back again afterwards.

To automate the configuration of these systems and the VMs running on them I use Ansible. For a freshly-imaged, new installation of ESXi one of the first things I do it to run an Ansible playbook that sets up the ESXi host, and the first thing it does is to install the ssh keys of the people who need to log in as root, then it updates the root password.

I have ssh public keys for every user that needs root access. A short bash script combines those keys and my Ansible management public key into authorized_keys files for the ESXi hosts in each vCenter instance. In my Ansible group_vars/ directory is a file for each group of ESXi hosts, so all of the ESXi hosts in a group get the same root password and ssh keys. This also makes it easy to change root passwords and add and remove ssh keys of users as they are added to or leave different groups.

Here’s a portion of a group_vars/esxi_hosts_cicd/credentials.yml file for a production CICD cluster:

# ESXI Hosts (only Ops can ssh in)
esxi_root_authorized_keys_file: authkeys-ops

esxi_username: 'root'
esxi_password: !vault |
          $ANSIBLE_VAULT;1.1;AES256
          34633832366431383630653735663739636466316262
          39363165663566323864373930386239380085373464
          32383863366463653365383533646437656664376365
          31623564336165626162616263613166643462356462
          34633832366431383630653735663739636466316262
          39363165663566323864373930386239380085373464
          32383863366463653365383533646437656664376365
          31623564336165626162616263613166643462356462
          3061

The password is encrypted using Ansible Vault.

In my main.yml file I call the esxi_host role for all of the hosts in the esxi_hosts inventory group. Since I use a different user to manage non-ESXi hosts, the play that calls the role tells Ansible to use the root user only when logging into ESXi hosts.

- name: Setup esxi_hosts
  gather_facts: False
  user: root
  hosts: esxi_hosts
  roles:
    - esxi_host

The esxi_host role has an esxi_host/tasks/main.yml playbook. The two plays that update the authorized_keys file and root password look like this:

- name: Set the authorized ssh keys for the root user
  copy:
    src: "{{ esxi_root_authorized_keys_file }}"
    dest: /etc/ssh/keys-root/authorized_keys
    owner: root
    group: root
    mode: '0600'

- name: Set the root password for ESXI Hosts
  shell: "echo '{{ esxi_password }}' | passwd -s"
  no_log: True

The first time I run this the password is set to some other value, so I start Ansible with:

ansible-playbook main.yml \
    --vault-id ~/path/to/vault/private/key/file \
    -i inventory/ \
    --limit [comma-separated list of new esxi hosts] \
    --ask-pass \
    --ask-become-pass

This will prompt me for the current root ssh password. Once I enter that it logs into each ESXi host, installs the new authorized_keys file, uses the vault private key to decrypt the password, then updates the root password.

After I’ve done this once, since the Ansible ssh key is also part of the authorized_keys file, subsequent Ansible updates just use the ssh key to login, and I don’t have to use --ask-pass or --ask-become-pass parameters.

This is also handy when switching a host from one cluster to another. As long as the ssh keys are installed I no longer need the current root password to update the root password.

Hope you find this useful.

post

Generate a crypted password for Ansible

The Ansible user: command allows you to add a user to a Linux system with a password. The password must be passed to Ansible in a hashed password format using one of the hash formats supported by /etc/shadow.

Some Ansible docs suggest storing your passwords in plain text and using the Ansible SHA512 filter to hash the plaintext passwords before passing them to the user module. This is a bad practice for a number of reasons.

Storing your passwords in plain text is a bad idea

  • Storing your passwords in plain text is a bad idea, since anyone who can read your Ansible playbook now knows your password.
  • The play is not idempotent, since the SHA512 filter will re-hash the password every time you run the play, resetting the password each time the play is run.
  • Attempting to make the play idempotent, by using update_password: on_create, means that you can no longer update the password using Ansible. This might be OK if you’re just updating one machine. It’s a giant pain in the ass if you need to update the password on many machines.

A better way is to hash the password once using openssl and store the hashed version of the password in your Ansible playbooks:

- name: Set the user's password
  user:
    name: earl
    password: "$6$wLZ77bHhLVJsHaMz$WqJhNW2VefjhnupK0FBj5LDPaONaAMRoiaWle4rU5DkXz7hxhl3Gxcwshuy.KQWRFt6YPWXNbdKq9B/Rk9q7A."

To generate the hashed password use the openssl passwd command on any Linux host:

openssl passwd -6 -stdin

This opens an interactive shell to openssl. Just enter the password that you want to use, hit enter, and openssl will respond with the hashed version. Copy and paste the hashed version of the password into Ansible, and the next time you run Ansible on a host the user’s password will be updated.

Type Ctrl-D to exit the interactive openssl shell.

Since you used the interactive shell the plaintext password that you entered is not saved into the Linux host’s history file and is not visible to anyone running ps.

The crypted password is encrypted with a SHA512 one-way hash and a random 16 character salt, so you can check the playbook into a Git repository without revealing your password.

Hope you find this useful.

Why adding a .conf or .cfg file to /etc/sudoers.d doesn’t work

I needed to add some sudo access rights for support personnel on about a hundred Centos 6.6 servers. Currently no one one these hosts had sudo rights, so the /etc/sudoers file was the default file. I’m using Ansible to maintain these hosts, but rather than modify the default /etc/sudoers file using Ansible’s lineinfile: command, I decided to create a support.conf file and use Ansible’s copy: command to copy that file into /etc/sudoers.d/. That way if a future version of Centos changes the /etc/sudoers file I’m leaving that file untouched, so my changes should always work.

  - name: Add custom sudoers
    copy: src=files/support.conf dest=/etc/sudoers.d/support.conf owner=root group=root mode=0440 validate='visudo -cf %s'

The support.conf file I created copied over just fine, and the validation step of running “visudo -cf” on the file before moving it into place claimed that the file was error-free and should work just fine as a sudoers file.

I logged in as the support user and it didn’t work:

[support@c1n1 ~]$ sudo /bin/ls /var/log/*
support is not in the sudoers file.  This incident will be reported.

Not only did it not work, it was telling me that the support user wasn’t even in the file, which they clearly were.

After Googling around a bit and not finding much I saw this in the Sudoers Manual:

sudo will read each file in /etc/sudoers.d, skipping file names that end in ‘~’ or contain a ‘.’ character to avoid causing problems with package manager or editor temporary/backup files.

sudo was skipping the file because the file name contained a period!

I changed the name of the file from support.conf to support and it worked.

  - name: Add custom sudoers
    copy: src=files/support dest=/etc/sudoers.d/support owner=root group=root mode=0440 validate='visudo -cf %s'

Hope you find this useful.

Here’s a snippet from /etc/sudoers.d/support if you’re interested. The “support” user has already been created by a separate Ansible command.

# Networking
Cmnd_Alias NETWORKING = /sbin/route, /sbin/ifconfig, /bin/ping, /sbin/dhclient, /usr/bin/net, /sbin/iptables, /usr/bin/rfcomm, /usr/bin/wvdial, /sbin/iwconfig, /sbin/mii-tool

# Installation and management of software
Cmnd_Alias SOFTWARE = /bin/rpm, /usr/bin/up2date, /usr/bin/yum

# Services
Cmnd_Alias SERVICES = /sbin/service, /sbin/chkconfig

# Reading logs
Cmnd_Alias READ_LOGS = /usr/bin/less /var/log/*, /bin/more /var/log/*, /bin/ls /var/log/*, /bin/ls /var/log

support  ALL = NETWORKING, SOFTWARE, SERVICES, READ_LOGS
post

Peerio promises privacy for everyone

A new company called Peerio is promising secure, easy messaging and file sharing for everyone. They’re building apps that encrypt everything you send or share, making the code for these apps open source, and paying for security audits to peer-review the source code, looking for security weaknesses.

They’ve put together a short video to explain the basics of what they offer. I thought I’d give it a try and see how it works.

I went to Peerio.com using the Chrome browser, so the home page automatically offered to install Peerio on Chrome.

I clicked the install button and Peerio popped up as a new Chrome app.

peerio-on-chrome

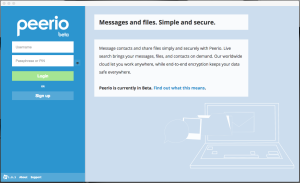
Clicking the app brought up the new account screen, with the word “beta” displayed in small type just under the company logo, so they’re letting me know up front that this is going to be a little rough.

peerio-sign-up

I clicked Sign Up, added a user name and email address, and was prompted for a pass phrase.

I have a couple of pass phrases I use. I typed one in, but apparently it wasn’t long enough. I tried another and another. Not long enough. The words “ALMOST THERE. JUST A FEW MORE LETTERS…” appeared on screen. One phrase I typed in had 40+ letters in it, but still the words “ALMOST THERE. JUST A FEW MORE LETTERS…” persisted. Tried again, this time putting spaces between the words. Phrase accepted! Maybe the check is trying to verify the number of space-separated words, not the total number of characters? Anyhow, got past that hurdle.

Next it sends you an email with a confirmation code and gives you 10 minutes (with a second by second countdown) to enter the confirmation code. I guess if you don’t enter it within 10 minutes your account is toast?

Once past that step I was prompted to create a shorter PIN code that can be used to login to the site. The long pass phrase is only needed to log in the first time you use a new device, after that your PIN can be used. I tried entering a few short number sequences. All were rejected as “too weak” so I used a strong, unique password with a mix of upper and lowercase letters, numbers, and special characters. The screen hid what I was typing and only asked for the PIN once, so if I thumb-fingered it, my account was going to be rendered useless pretty quickly. Hopefully I typed what I thought I typed.

peerio-all-set-up

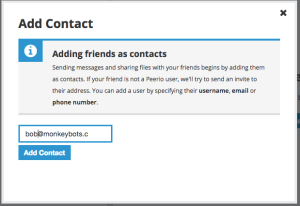
Of course to use the service to send messages to people you have to load your contacts in. I added a friend’s email and Peerio sent him an invite. Tried adding another email address and the “Add Contact” form cut me off at the “.c” in “.com” — looks like the folks at Peerio only let you have friends with email addresses that are less than 16 characters long. My friends at monkeybots.com, you’re out of luck.

peerio-add-contact

The Contacts tab has sub-tabs for “All Contacts”, “Confirmed Contacts”, and “Pending Contacts”, but the one email address I entered that was less than 16 characters long didn’t show up anywhere (I expected to see it under “Pending Contacts”). With my entries disappearing or truncated, I stopped trying to use the system.

It’s an interesting idea for a service, the source code for the clients is supposed to be available on Github, but the Peerio.com site directed me to https://github.com/TeamPeerio for the source, and that link is 404. Searching Github for “Peerio” shows https://github.com/PeerioTechnologies/peerio-client and https://github.com/PeerioTechnologies/peerio-website, so it looks like this is just a case of a BETA web site with a broken link.

Before the developers pay for another security audit, they really ought to try doing some basic usability testing — set up a new user in front of a laptop, and make two videos — one of the keyboard and screen and one of the user’s face, and then watch them try to log in and set up an account. I think they’d find the experience invaluable.

Anyhow, if you’re interested and feel like trying out their very BETA (feels like ALPHA) release, head over to Peerio.com and sign up. If you want to send me a message, you can reach me on Peerio as “earl”.