Amazon announced the development of the Amazon Elastic File System (AWS EFS) in 2015. EFS was designed to provide multiple EC2 instances with shared, low-latency access to a fully-managed file system. On June 28, 2016 Amazon announced that EFS is now available for production use in the US East (Northern Virginia), US West (Oregon), and Europe (Ireland) Regions.
Apcera‘s NFS Service Gateway can be used to access AWS EFS storage volumes within containers. You can use EFS to provide persistent storage to your containers running on AWS-hosted clouds in regions where EFS is available.
Gathering information
Before you begin you will need to know:
- The name of the AWS Region where your Apcera Platform is running
- The name/ID of the AWS VPC where your Apcera Platform is running
- The name/ID of the AWS security group for your Apcera Platform
Setting up an EFS volume
- Log into your AWS console.
- Select the name of the AWS Region where your Apcera Platform is running on the upper right side of the screen.
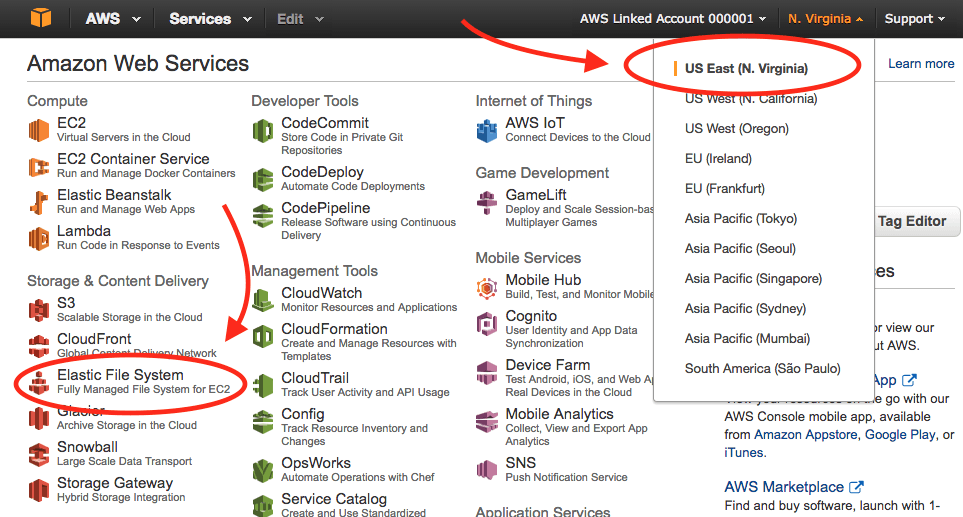
- Select Elastic File System.
- Click Create File System.
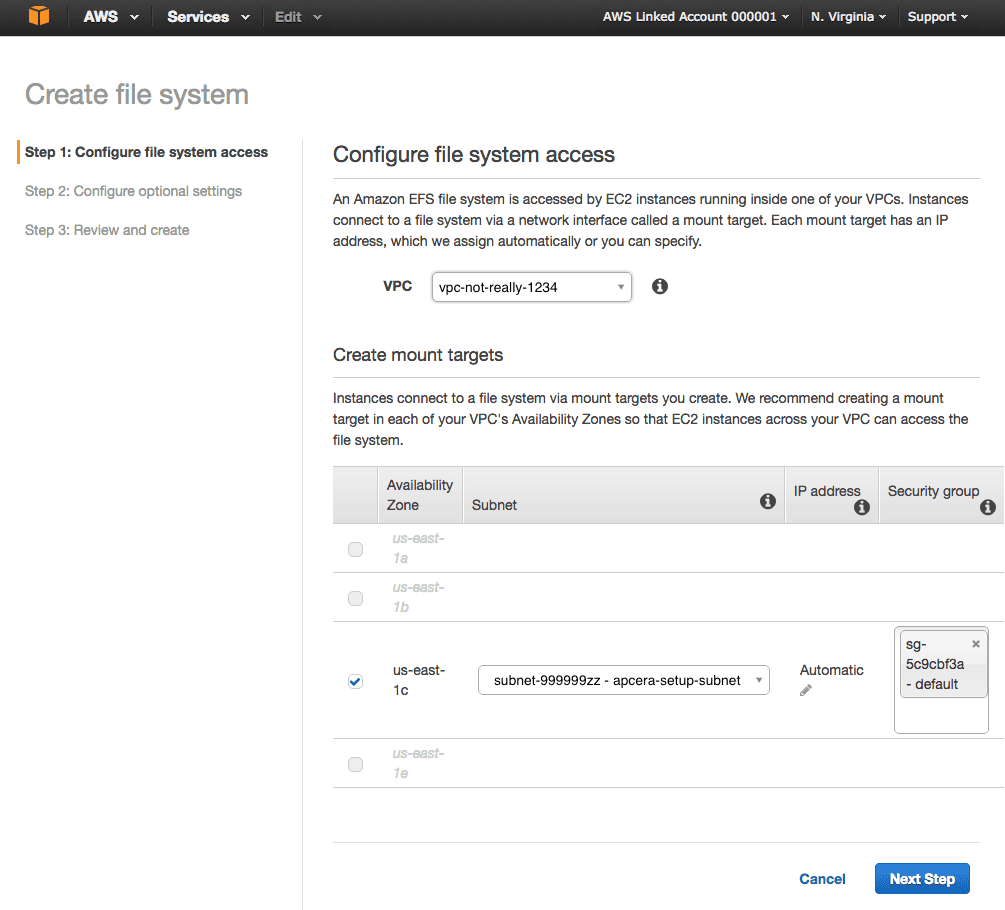
- Configure the file system access:
- Select the name of the VPC.
- The availability zone and subnet should be selected for you automatically.
- If your VPC has more than one subnet (unusual) then select the subnet containing the Instance Managers that will be connecting to the EFS volume.
- Leave IP address set to Automatic.
- The first EFS volume you create will create a new security group. Use that security group for this and all future EFS volumes. Write down the name of the new EFS security group – we’ll configure it in the next few steps.
- Click Next Step
- Configure optional settings:
- Set the name of the EFS volume.
- Choose the performance mode.
- Click Next Step
mounting-aws-with-esf-inside-docker
- Review and create:
- If everything looks OK, click Create File System.
mounting-aws-with-esf-inside-docker - You should see a “Success!” message and a new EFS volume with “Life Cycle State” = “Creating”.
- Write down the IP address of the EFS volume.
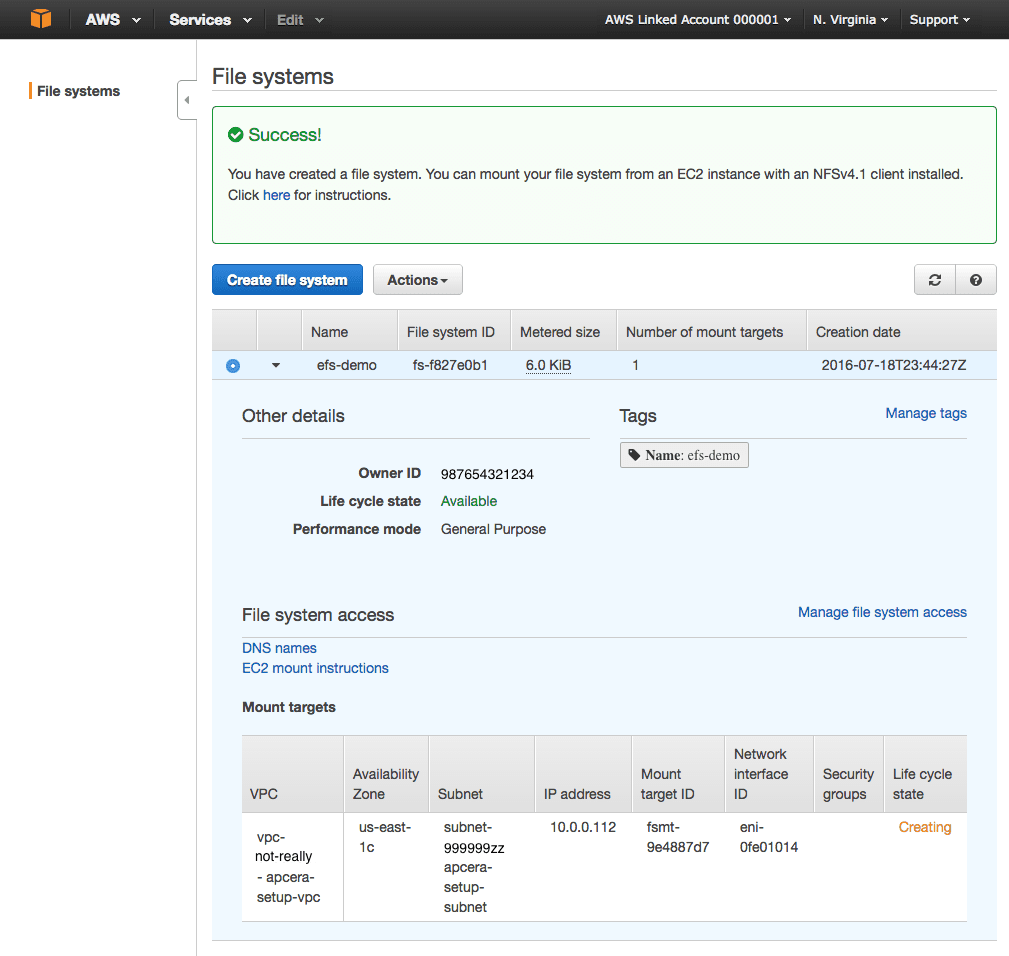
Update the EFS security group
- Go back to the main console menu and select EC2.
- Click Security Groups in the left hand nav menu.
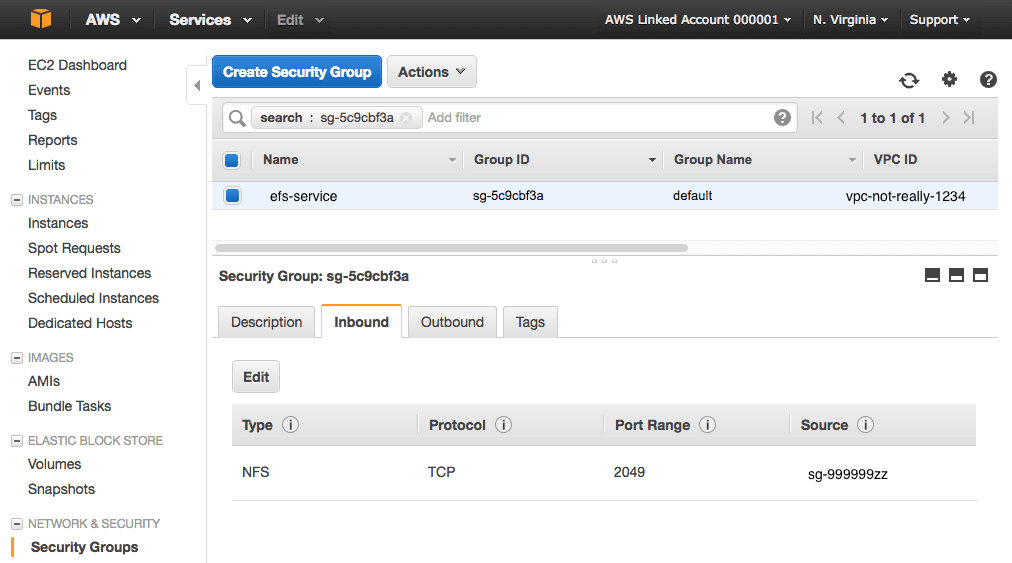
- Type the name of the new EFS security group into the search filter list.
- On the bottom half of the screen delete the default inbound and outbound rules.
- Add one inbound rule to allow all TCP traffic on port 2049 from the source “name/ID of the AWS security group for your Apcera Platform”
- Add one outbound rule to allow all TCP traffic on port 2049 to the destination “name/ID of the AWS security group for your Apcera Platform”
- This allows all VMs within your Apcera Platform security group to connect to your EFS volume on port 2049 (NFS).
- No other traffic from any other source or to any other destination is allowed.|
Create an NFS Provider for the EFS volume
We’re going to create a single provider for the EFS volume. Each time you have a container or set of containers that need a persistent file system, just create a new service from the same provider. Each new service will carve out a new namespace on the EFS volume, keeping the files associated with that service separate from the files in all other services that use the same provider.
According to the EFS FAQ, When you create a file system, you create endpoints in your VPC called “mount targets.” Each mount target provides an IP address and a DNS name, and you use this IP address or DNS name in your mount command. Only resources that can access a mount target can access your file system. Since the Apcera Platform isn’t using Amazon DNS services internally, we’ll use the IP address to connect to the EFS volume.
To create the provider, you need to construct a URL describing the volume. In this case, we’ll use the internal IP address of the EFS volume as the hostname and / as the exported volume name. All EFS volumes use the NFS v4.1 protocol. If the IP address of the EFS volume is 10.0.0.112 we’d construct a provider using:
apc provider register awsefs --type nfs \
    --url "nfs://10.0.0.112/" \
    --description 'Amazon EFS' \
    --batch \
    -- --version 4.1
Create a service from the provider:
apc service create efs-service-1 \
    --provider awsefs \
    --description 'Amazon EFS Service' \
    --batch
Create a capsule, bind the service to the capsule, and connect to the capsule:
apc capsule create efs-capsule1 --image linux -ae --batch
apc service bind efs-service-1 --job efs-capsule1 \
    --batch -- --mountpath /an/unlimited/supply
apc capsule connect efs-capsule1
Once connected, type df -k to see the mounted file system.
You can bind this service to any container that needs a shared, persistent file system. Each time you need a new shared, persistent file system for a container or group of containers just create a new service using the same provider and bind the service to your job or jobs.
Persistence for Docker
Now that we have a provider that can carve out EFS storage for containers, let’s try spinning up some Docker images.
On the Apcera Platform, if the specification for a Docker image (Dockerfile) specifies that the app requires persisted volumes, you must do one of the following when creating the job:
- Include the –provider flag when you create or run the Docker job. You must include this flag if you include the –volume flag when creating or running the Docker job.
- Include the –ignore-volumes flag when you create or run the Docker job.
Here is an example of running NGINX inside a Docker container on the Apcera platform, where the content for the site is stored on an EFS volume:
I’m using the Apcera “apc” command-line tool to build the container, pulling the nginx image directly off hub.docker.com, telling it to use the awsefs EFS volume provider I created earlier for persistence, and to mount the EFS volume at the mount point “/usr/share/nginx/html”.
Now connect to the container:
/proc/mounts contains a list of all of the container’s mount points. I can verify that the container does indeed have an EFS volume by grepping /proc/mounts for the mount point:
Grepping for “/usr/share/nginx/html” shows the IP address 10.0.0.112, which is the IP of the EFS volume, the log directory name after is the unique namespace for the service, the mountpoint is “/usr/share/nginx/html”, and the mount type “nfs4”.
There is no content in the directory, so I add some by echoing some HTML code to an index.html file. My container will proclaim to the world “NGINX in a Docker container on Apcera with content stored on EFS” in an H3 typeface!
Now that I have some content I need to add a route to the content. Right now the NGINX container is running, and listening on ports 80 and 443, but it’s completely isolated from the outside world — no one can connect to those ports unless there’s a route (a URL) set up.
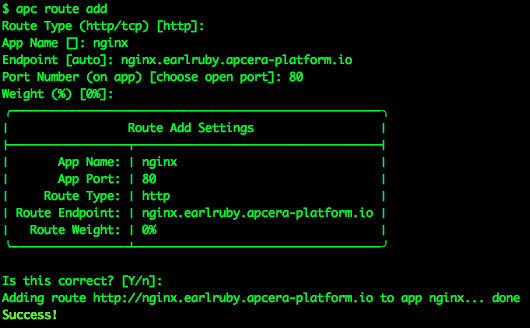
My cluster is running on the domain earlruby.apcera-platform.io, so I add a route like so:
I have successfully added the http route http://nginx.earlruby.apcera-platform.io/ to my NGINX container. This is a real public DNS entry. To verify that it works I point my browser at the route I just added:
Success!
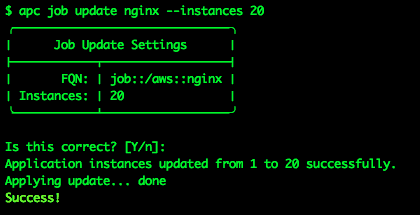
Such an amazing app is bound to go viral, and a single NGINX container may not be able to keep up with the load. I want to ensure that my app can keep up and remain highly-available, and that it keeps running even if one or more VMs in my cluster get killed off, so I add more NGINX containers:
Now I’ve got 20 containers running my NGINX app, all serving up the same content, running on multiple VMs across my cluster, all load-balanced under the single URL http://nginx.earlruby.apcera-platform.io/. If any container gets killed off, the Apcera platform will spin up a new one. If any VM in the cluster dies, any containers running on it will automatically be migrated to new hosts. If I want to scale up the app to 100 or 1000 containers, or back down to 1, it’s a one-line command to make the change.
In terms of resources, I’m using slightly less than 45 MiB to run those 20 containers. That’s not a typo — 45MiB! Containers are much more efficient users of RAM than VMs.
I hope you find this useful.
This article originally appeared as an Apcera blog post on July 21, 2016.


