Restarting network interfaces in Ansible

I’m using Ansible to set up the network interface cards of multiple racks of storage servers running Centos 6.6. Each server has four network interfaces to configure, a public 1GbE interface, a private 1GbE interface, and two 10GbE interfaces that are set up as a bonded 20GbE interface with two VLANs assigned to the bond.

If Ansible changes an interface on a server it calls a handler to restart the network interfaces so the changes go into effect. However, I don’t want the network interfaces of every single server in a cluster to restart at the same time, so at the beginning of my network.yml playbook I set:

  serial: 1

That way Ansible just updates the network config of one server at a time.

Also, if there are any failures I want Ansible to stop immediately, so if I screwed something up I don’t take out the networking to every computer in the cluster. For this reason I also set:

max_fail_percentage: 1

If a change is made to an interface I’ve been using the following handler to restart the interface:

- name: Restart Network
  service: name=network state=restarted

That works, but about half the time Ansible detects a failure and drops out with an error, even though the network restarted just fine. Checking the server immediately after Ansible says that there’s an error shows that the server is running and it’s network interfaces were configured correctly.

This behavior is annoying since you have to restart the entire playbook after one server fails. If you’re configuring many racks of servers and the network setup is just updating one server at a time I’d end up having to restart the playbook a half dozen times to get through it, even though nothing was actually wrong.

At first I thought that maybe the ssh connection was dropping (I was restarting the network after all) but you can log in via ssh and restart the network and never lose the connection, so that wasn’t the problem.

The connection does pause as the interface that you’re ssh-ing in over resets, but the connection comes right back.

I wrote a short script to repeatedly restart the network interfaces and check the exit code returned, but the exit code was always 0, “no errors”, so network restart wasn’t reporting an error, but for some reason Ansible thought there was a failure.

There’s obviously some sort of timing issue causing a problem, where Ansible is checking to see if all is well, but since the network is being reset the check times out.

I initially came up with this workaround:

- name: Restart Network
  shell: service network restart; sleep 3

That fixes the problem, however, since “sleep 3” will always exit with a 0 exit code (success), Ansible will always think this worked even when the network restart failed. (Ansible takes the last exit code returned as the success/failure of the entire shell operation.) If “service network restart” actually does fail, I want Ansible to stop processing.

In order to preserve the exit code, I wrote a one-line Perl script that restarts the network, sleeps 3 seconds, then exits with the same exit code returned by “service network restart”.

- name: Restart Network
  # Restart the network, sleep 3 seconds, return the
  # exit code returned by "service network restart".
  # This is to work-around a glitch in Ansible where
  # it detects a successful network restart as a failure.
  command: perl -e 'my $exit_code = system("service network restart"); sleep 3; $exit_code = $exit_code >> 8; exit($exit_code);'

Now Ansible grinds through the network configurations of all of the hosts in my racks without stopping.

Hope you find this useful.

post

Peerio promises privacy for everyone

A new company called Peerio is promising secure, easy messaging and file sharing for everyone. They’re building apps that encrypt everything you send or share, making the code for these apps open source, and paying for security audits to peer-review the source code, looking for security weaknesses.

They’ve put together a short video to explain the basics of what they offer. I thought I’d give it a try and see how it works.

I went to Peerio.com using the Chrome browser, so the home page automatically offered to install Peerio on Chrome.

I clicked the install button and Peerio popped up as a new Chrome app.

peerio-on-chrome

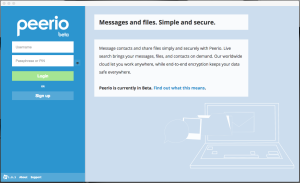
Clicking the app brought up the new account screen, with the word “beta” displayed in small type just under the company logo, so they’re letting me know up front that this is going to be a little rough.

peerio-sign-up

I clicked Sign Up, added a user name and email address, and was prompted for a pass phrase.

I have a couple of pass phrases I use. I typed one in, but apparently it wasn’t long enough. I tried another and another. Not long enough. The words “ALMOST THERE. JUST A FEW MORE LETTERS…” appeared on screen. One phrase I typed in had 40+ letters in it, but still the words “ALMOST THERE. JUST A FEW MORE LETTERS…” persisted. Tried again, this time putting spaces between the words. Phrase accepted! Maybe the check is trying to verify the number of space-separated words, not the total number of characters? Anyhow, got past that hurdle.

Next it sends you an email with a confirmation code and gives you 10 minutes (with a second by second countdown) to enter the confirmation code. I guess if you don’t enter it within 10 minutes your account is toast?

Once past that step I was prompted to create a shorter PIN code that can be used to login to the site. The long pass phrase is only needed to log in the first time you use a new device, after that your PIN can be used. I tried entering a few short number sequences. All were rejected as “too weak” so I used a strong, unique password with a mix of upper and lowercase letters, numbers, and special characters. The screen hid what I was typing and only asked for the PIN once, so if I thumb-fingered it, my account was going to be rendered useless pretty quickly. Hopefully I typed what I thought I typed.

peerio-all-set-up

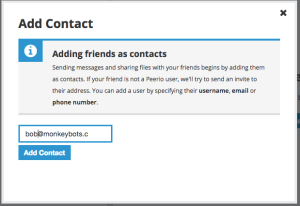
Of course to use the service to send messages to people you have to load your contacts in. I added a friend’s email and Peerio sent him an invite. Tried adding another email address and the “Add Contact” form cut me off at the “.c” in “.com” — looks like the folks at Peerio only let you have friends with email addresses that are less than 16 characters long. My friends at monkeybots.com, you’re out of luck.

peerio-add-contact

The Contacts tab has sub-tabs for “All Contacts”, “Confirmed Contacts”, and “Pending Contacts”, but the one email address I entered that was less than 16 characters long didn’t show up anywhere (I expected to see it under “Pending Contacts”). With my entries disappearing or truncated, I stopped trying to use the system.

It’s an interesting idea for a service, the source code for the clients is supposed to be available on Github, but the Peerio.com site directed me to https://github.com/TeamPeerio for the source, and that link is 404. Searching Github for “Peerio” shows https://github.com/PeerioTechnologies/peerio-client and https://github.com/PeerioTechnologies/peerio-website, so it looks like this is just a case of a BETA web site with a broken link.

Before the developers pay for another security audit, they really ought to try doing some basic usability testing — set up a new user in front of a laptop, and make two videos — one of the keyboard and screen and one of the user’s face, and then watch them try to log in and set up an account. I think they’d find the experience invaluable.

Anyhow, if you’re interested and feel like trying out their very BETA (feels like ALPHA) release, head over to Peerio.com and sign up. If you want to send me a message, you can reach me on Peerio as “earl”.

Stop mounting ISO files in Linux with “-t iso9660”

Google “How do I mount an ISO image in Linux” and most of the links still say to use “-t iso9660”. For example:

mount -t iso9660 -o loop,ro diskimage.iso /mnt/iso

That worked fine 10 years ago, but these days not all ISOs use ISO9660 file systems. Many use the UDF (Universal Disk Format) file system, and if you specify ISO9660 when mounting a UDF ISO file, subtle problems can occur. For instance, file names that contain upper case letters on a UDF file system will appear in lower case when that ISO is mounted using ISO9660.

On any modern Linux distro mount is smart enough to figure out what type of file system to use when mounting an ISO file, so it’s perfectly fine to let mount infer the type, e.g.:

mount -o loop,ro diskimage.iso /mnt/iso

Here’s an example of what happens when you try to mount a type UDF ISO as type ISO9660. Note that the case of the file names changes to all lower case when mounting as iso9660, which in this case causes subtle errors to occur within the software.

[~]$ blkid /srv/isos/specsfs/SPECsfs2014-1.0.iso
/srv/isos/specsfs/SPECsfs2014-1.0.iso: UUID="2014-10-22-15-52-41-00" LABEL="SPEC_SFS2014" TYPE="udf"

[~]$ mount -t iso9660 -o loop,ro /srv/isos/specsfs/SPECsfs2014-1.0.iso /mnt/iso
[~]$ cd /mnt/iso
[/mnt/iso]$ ls
benchmarks.xml    netmist_modify     redistributable_sources
binaries          netmist_modify.c   sfs2014result.css
copyright.txt     netmist_monitor    sfs_ext_mon
docs              netmist_monitor.c  sfsmanager
import.c          netmist_pro.in     sfs_rc
license.txt       netmist_proj       spec_license.txt
makefile          netmist.sln        specreport
map_share_script  notice             submission_template.xml
mempool.c         pdsm               token_config_file
mix_table.c       pdsmlib.c          win32lib
netmist.c         rcschangelog.txt   workload.c
netmist.h         readme.txt

[/mnt/iso]$ cd
[~]$ umount /mnt/iso
[~]$ mount -o loop,ro /srv/isos/specsfs/SPECsfs2014-1.0.iso /mnt/iso
[~]$ cd /mnt/iso
[/mnt/iso]$ ls
benchmarks.xml    netmist_modify     redistributable_sources
binaries          netmist_modify.c   sfs2014result.css
copyright.txt     netmist_monitor    sfs_ext_mon
docs              netmist_monitor.c  SfsManager
import.c          netmist_pro.in     sfs_rc
license.txt       netmist_proj       SPEC_LICENSE.txt
makefile          netmist.sln        SpecReport
Map_share_script  NOTICE             submission_template.xml
mempool.c         pdsm               token_config_file
mix_table.c       pdsmlib.c          win32lib
netmist.c         rcschangelog.txt   workload.c
netmist.h         README.txt

Click to stream .m3u files in Ubuntu

I just recently heard about CCMixter.org on FLOSS Weekly. CCMixter.org is a resource and collaborative space for musicians and remixers. They have thousands of music tracks which can be downloaded, remixed, sampled, or streamed.

I recently did a fresh install of Ubuntu on the computer I was using, and clicking on any of CCMixter’s streaming links caused a window to pop up asking me if I wanted to play the stream using Rhythmbox or “Other”. Selecting Rhythmbox popped up Rhythmbox, but it wouldn’t play the stream. Googling around a bit led me to discussions of Rhythmbox brokenness going back to 2008, so I took a different tack.

I fired up Synaptic Package Manager and installed the VLC Media Player.

Then I clicked the gear icon on Unity’s upper right menu bar, selected “About this Computer”, clicked Default Applications, and changed the default application for Music to “VLC Media Player.”

Now when I click on a link to an .m3u stream, Ubuntu sends the link to VLC, and the music starts to play.

Hope you find this useful.

Get Ansible’s “pip” method to install the right version of Django

I was using Ansible to set up a bunch of Scientific Linux 6.6 servers running Django and I wanted to use a specific version of Django, version 1.6.5, on all servers.

Ansible makes this easy with the “pip” module:

  - name: Install pip package from yum
    yum: name={{ item }} state=present
    with_items:
    - python-pip
    - python-setuptools

  - name: Install Django 1.6.5
    pip: name=django version=1.6.5 state=present

This works great if you’re installing on a clean, empty server, but if you’re upgrading a server that had an older version of Django on it (1.6.4 in my case) Ansible will act as if it’s installing 1.6.5, but when it’s done I still had version 1.6.4.

If I try using straight PIP commands I get this:

$ pip install django==1.6.5
Downloading/unpacking django==1.6.5
  Running setup.py egg_info for package django
    warning: no previously-included files matching '__pycache__' found under directory '*'
    warning: no previously-included files matching '*.py[co]' found under directory '*'
  Requested django==1.6.5, but installing version 1.6.4
Installing collected packages: django
  Found existing installation: Django 1.6.4
    Uninstalling Django:
      Successfully uninstalled Django
  Running setup.py install for django
    warning: no previously-included files matching '__pycache__' found under directory '*'
    warning: no previously-included files matching '*.py[co]' found under directory '*'
    changing mode of /usr/bin/django-admin.py to 755
Successfully installed django
Cleaning up...

Note the line “Requested django==1.6.5, but installing version 1.6.4”. Thanks PIP!

It turned out to be a bug in PIP versions earlier than PIP 1.4, not Ansible. A little Googling turned up a page on Stackoverflow that pointed the finger at an old cached copy of 1.6.4 in the build directory, which I found in /tmp/pip-build-root.

I updated my Ansible YAML file to get rid of the temporary directory and now it works fine:

  - name: Install pip package from yum
    yum: name={{ item }} state=present
    with_items:
    - python-pip
    - python-setuptools

  - name: Remove PIP temp directory
    file: path=/tmp/pip-build-root state=absent

  - name: Install Django 1.6.5
    pip: name=django version=1.6.5 state=present

Hope you find this useful.